如果做网站需要多少钱开封网络营销方式
如今,消费者更加谨慎,消费决策也更加理性。在这一消费环境下,美妆护肤市场中,面对动辄几百上千的化妆品,小样或体验装无疑能够降低消费者的试错成本。由此,这门生意也一直备受关注。
并且,小样正逐步撕掉“免费”“非卖品”的属性标签,越来越多品牌开始主动售卖小样/体验装,原本作为赠品的小样逐渐发挥出更大的价值。
根据鲸参谋电商数据分析平台的相关数据显示,2023年7月份,京东平台美妆护肤小样的商品总销量超过30万,商品的总销额将近2000万,涉及的店铺超过640个,相关品牌将近420个。
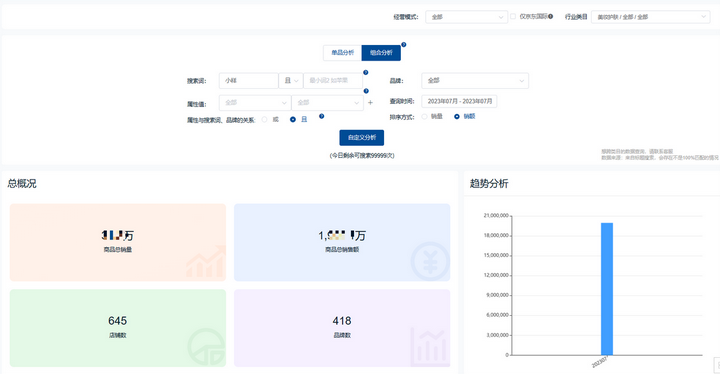
*数据源于鲸参谋-自定义搜索分析(来自公开渠道获取,数据仅供参考)
目前,美妆护肤市场中,国际品牌开始在线上渠道重点营销和销售小样产品。根据鲸参谋平台的数据显示,今年7月份,京东美妆护肤品体验装TOP10的品牌几乎均为外资品牌。
雅诗兰黛、SK-II、迪奥三大品牌的市场份额相对领先。其中,雅诗兰黛品牌当月的销额突破300万,市占比高达15%;SK-II品牌销额为230万+,市占将近12%。
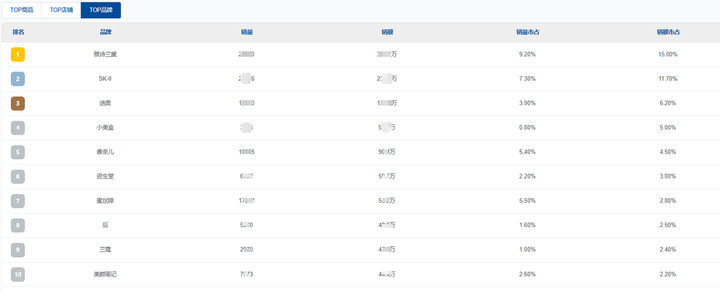
*数据源于鲸参谋-自定义搜索分析(来自公开渠道获取,数据仅供参考)
在TOP10店铺中,20%的店铺月交易额超过200万,40%的店铺月交易额破百万,70%的店铺月交易额为50万+。排名前三的店铺分别是1号会员店、SK-II京东自营官方旗舰店和Estee Lauder雅诗兰黛京东自营官方旗舰店。
今年7月份,1号会员店的销量为2.7万+,销售额为248万;SK-II京东自营官方旗舰店的销量将近2.3万,销售额为230万+;Estee Lauder雅诗兰黛京东自营官方旗舰店的销量为1.6万+,销售额为170万+。三个店铺所占的市场份额将近33%。
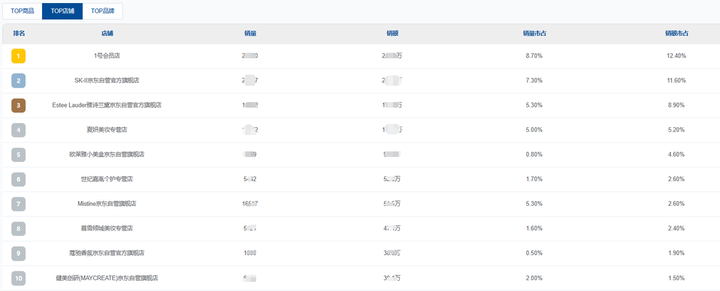
*数据源于鲸参谋-自定义搜索分析(来自公开渠道获取,数据仅供参考)
整体而言,小规格的产品单价都偏低,在热销商品TOP10榜单中可以看到,即使是国际大牌的体验装,除去一些套装礼盒,产品的价格大多都在百元内。
排在热榜第一的是SK-II经典神仙水护肤小样试用装(10ml),7月份产品的销量为2万+,销售额为200万+,产品的市场均价为100元。此外,雅诗兰黛的特润修护精华露小样(15ml)和欧莱雅的小美盒护肤套组小样的交易额也都超过50万。
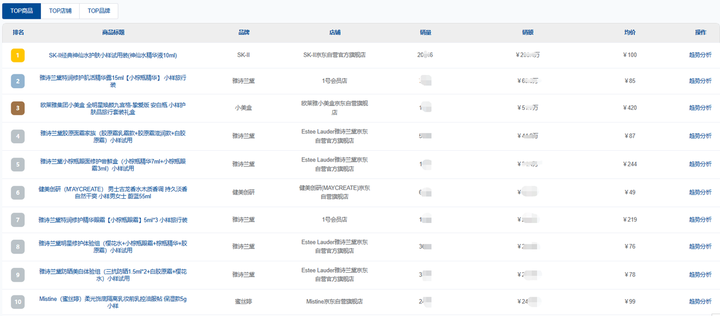
*数据源于鲸参谋-自定义搜索分析(来自公开渠道获取,数据仅供参考)
总之,在消费者更加理性的消费环境下,先体验再消费的方式也越来越流行。品牌小样热销不仅是能降低消费者的试错成本,另外还有利于品牌更多地激发消费者的消费潜力。不过,品牌最终能否提升产品复购率,关键还是要依靠产品力。
鲸参谋数据来源于公开渠道,数据获取可能存在不完全,分析结果仅供参考。
如想要查看京东(淘宝/天猫)全品类的销售数据(行业/品牌/店铺/商品/监控),欢迎搜索“鲸参谋电商数据”,或者直接评论留言和私信(也可接口对接)~