苏州网站建设专业的公司校园网站的意义
一、前言
近几年开发了一些大型的应用程序,在程序性能调优或者解决一些疑难杂症问题的过程中,遇到最多的还是与内存相关的一些问题。例如glibc内存分配器ptmalloc,google的内存分配器tcmalloc都存在“内存泄漏”,即内存不归还操作系统的问题;ptmalloc内存分配性能低下的问题;随着系统长时间运行,buffer/cache被某些应用大量使用,几乎完整占用系统内存,导致其他应用程序内存申请失败等等问题。
之所以内存相关的问题层出不穷,关键还是它的地位太重要了。这次还是与内存相关,分享的是追踪buffer/cache占用的内存到底被谁(哪些应用程序)偷吃了!
有关buffer/cache的文章,大多提及的是如何释放并归还到系统的方法,但是分析buffer/cache内存消耗背后原因的相关文章却凤毛麟角。buffer/cache为什么会增长,它到底被哪些程序使用了,我相信这也是很多同行的疑惑,因此想通过本篇文章分享一些buffer/cache内存消耗问题的跟踪方法,为类似问题的优化和解决提供一些参考。
二、问题描述
如下图1和图2所示,buffer/cache已经占用了46GB的内存,达到了整个系统内存的37%,这个占比已经非常高了。buffer/cache长期占用不释放,同时供系统上其它进程使用的可用内存几乎快没了。

图1

图2
长此以往,会出现什么问题呢?最直接的问题就是其他进程没法玩了,比如大一点的内存块就无法申请。之前我在文章里也详细介绍了buffer/cache的释放方法,解决了当时的燃眉之急。
为啥最近又开始与buffer/cache纠缠上了呢?
“echo 1 > /proc/sys/vm/drop_caches”释放的是所有cache,这些cache是当前系统上所有程序在运行过程中加载到内存的一些文件信息,这些信息被当做缓存用,好处是CPU下次读取某个文件时就会比第一次从磁盘读取快多了。drop_caches执行时会清空所有cache,这样会带来一个问题:当某些程序需要读取之前加载到cache的信息时就需要重新从磁盘读取,这就会产生IO等待,或者IO竞争,从而拖累程序性能。在某些平台上,我们已经发现有高性能程序因为cache的粗暴清空产生了性能抖动。因此,我们就没法像以前一样回避buffer/cache到底被谁使用的问题,并且直接粗暴释放的策略在某些平台上也就失效了。
根据上面的描述,我们当前面临的问题就是:究竟是谁占用了buffer/cache,以及弄清是谁占用后,是否可以规避它对buffer/cache的大量使用。面对这个问题,老板最近又上火了。

三、buffer/cache使用跟踪
开始介绍一下调查buffer/cache占用的跟踪思路吧。
1、hcache
网上有一些帖子分享了hcache可以查看哪些文件使用了cache,那hache真的可以帮助我们对buffer/cache进行全面调查吗?我们一起来看看。
根据前面的问题描述,当前buffer/cache已经占用了46GB的内存。先使用hcache查看一下top100的cache占用,如下图所示(截取了Cached靠前的一部分)。

图3
top100,即使top200的Size统计之和,也只有几个GB,离46GB相差甚远,结果说明hcache遗漏了很多cache的使用统计。
hcache还有一个能力,查看某个进程当前使用的cache。我们看看clickhouse的cache使用,结果如下图所示。

图4
正在运行的clickhouse,居然只能看到程序可执行文件本身当前的cache占用,程序运行过程中已打开的cache文件却没统计。不过这里有个小收获:程序加载进内存后,程序的可执行文件,依赖的库文件使用的内存都是在buffer/cache里。

图5
从上面的结果发现hcahce有很多缺点,只能粗略的看到一些可执行程序文件,或者一些库文件使用的cache大小,没有统计各程序运行态的cache使用,因此对cache占用问题的排查作用非常有限。
2、top + lsof + fincore
找了很多资料,除了hcache确实没有其他方法可以统计当前运行程序消耗的cache大小了,但是hcache本身不可靠。没有直接的办法,那就只有围魏救赵了,这也是buffer/cache分布情况不便跟踪调查的原因。
该从哪里入手呢?当然是top命令给方向,哪些程序cpu使用率高,且使用了一定的内存,那就查它。因为只有它们才有可能在不断的使用cache,调查大方向有了。

图6
下一步呢?buffer/cache的使用肯定跟文件相关啊,还是那句话:linux一切皆文件。那有没有可以实时查看某个进程当前已打开的文件方法?lsof命令可以!我们用lsof查一下clickhouse,某时刻,clickhouse打开的文件如下图7图8所示,篇幅太长,图7只截取了前面部分。
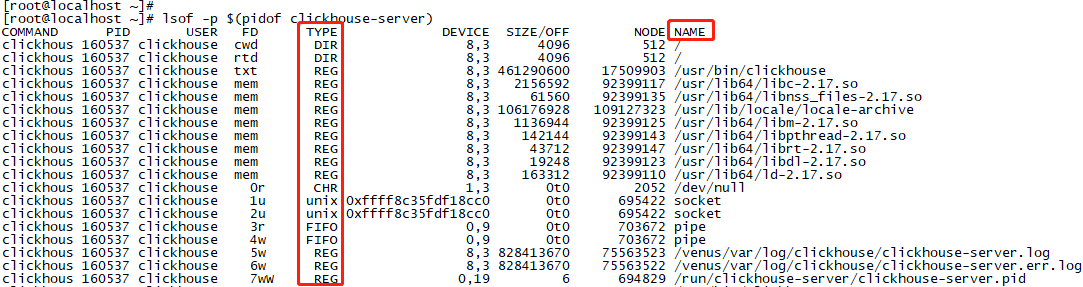
图7
图8只截取了类型TYPE=REG(REG表示文件类型为普通,还有DIR为目录等等等),即截取了clickhouse当前打开,且正在使用的一部分类型为普通的文件。
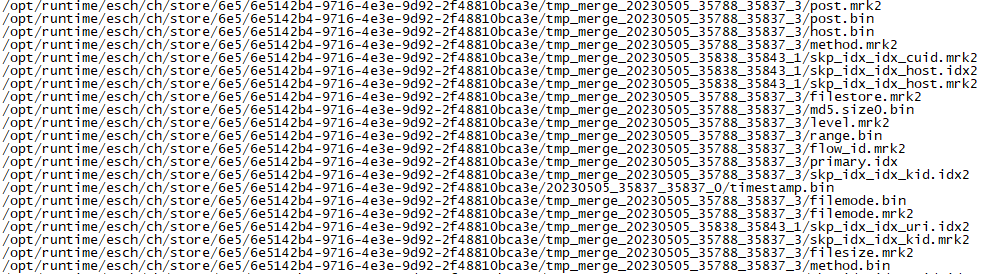
图8
不断的执行:lsof -p $(pidof clickhouse-server),发现每次查看到的文件名都不一样。好了,这说明clickhouse会在运行过程中不断的大量打开,读写和关闭文件。嫌疑很重了。
下一步呢?有没有办法可以实时查看当前这些文件是不是使用了cache,以及各自使用cache的大小?还真有,fincore可以查看某个文件使用的cache大小,轮子就是齐全啊,要啥有啥。
命令行:lsof -p $(pidof clickhouse-server) | grep 'REG' | awk '{print $9}' | xargs ./fincore --pages=false --summarize --only-cached *
截图较大,点开看会清晰一点。
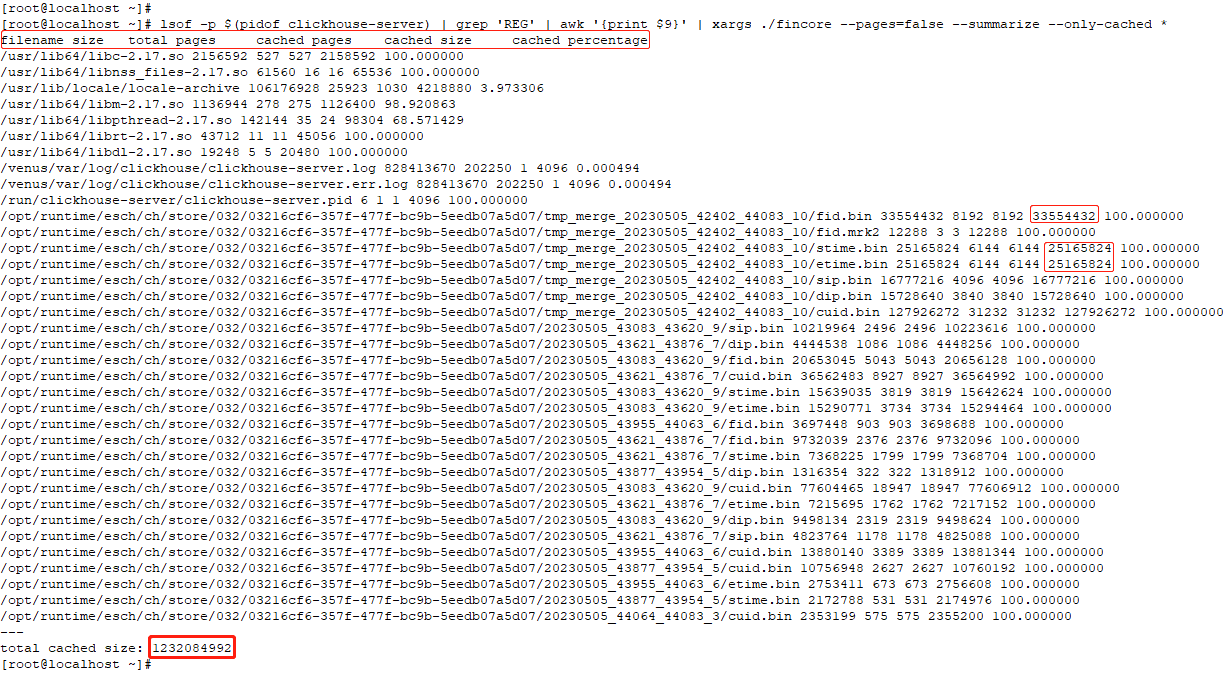
图9
fincore统计了命令行执行时,clickhouse当前打开的文件使用的cache之和为1.2GB左右。到这里,当前的探索结果与前文提到的问题:究竟是谁占用了buffer/cache,越来越接近了。
通过top + lsof,发现了一个非常重要的线索,就是clickhouse在目录/opt/runtime/esch/ch/store下频繁的打开了很多文件,那这个目录下面到底都是一些什么文件?有没有都使用了cache呢?clickhouse是不是cache的消耗大户呢?解决这些疑惑就产生了另外一个需求,需要一种可以统计指定目录的cache大小的工具。这次fincore也不行了,fincore有一个致命弱点,即只能获得某个指定文件的cache占用大小,不能获取指定目录使用的cache大小,更别指望统计嵌套目录的cache大小。因此,是时候该请vmtouch出场了
3、vmtouch
vmtouch可以统计指定目录的cache占用大小,即使是嵌套目录。迫不及待的直接奔主题,看看clickhouse目录/opt/runtime/esch/ch/store下是什么,以及使用了多少cache。截取了该目录下的部分文件,内容如下图所示。

图10
直接统计一下/opt/runtime/esch/ch/store目录占用的cache规模吧,结果如下图所示。

图11
shit,居然吃了我42GB的内存啊!地主家的余粮也不多啊---老板哭着说。激动之余,我还要确认一下42GB cache的使用者是不是它!如何证明呢,还是使用“echo 1 > /proc/sys/vm/drop_caches”,看看释放完毕之后,free可用内存的大小是否会增长42GB左右。
执行前的内存分布情况:

图12

图13
执行后的内存分布情况:

图14

图15
执行cache释放后,free从2GB变为了45GB,扩大了43GB;buffer/cache从46GB变为了3GB,减小了43GB。从cache释放了clickhouse的42GB+1GB其它程序占用的cache,说明我们环境上,clickhouse就是cache的消耗大户!老板沸不沸腾我不知道,反正我是沸腾了。
四、clickhouse cache耗费
为什么clickhouse对buffer/cache的消耗如此巨大?在好奇心的驱使下,又开始了新的调查。此时此景想到了一句歌词:一波还未平息,一波又来侵袭,茫茫人海,狂风暴雨。。。
1、clickhouse cache耗费原因
从哪开始调查呢?想起了lsof命令的执行结果,如前文图9所示的重要线索,clickhouse有大量时间都在打开目录:/opt/runtime/esch/ch/store/032/03216cf6-357f-477f-bc9b-5eedb07a5d07,判断该目录下面肯定有大量消耗cache的文件。直接进入该目录,继续使用vmtouch统计,不出所料,结果如下图所示,032目录就吃了24GB内存,心好痛啊。

图16
clickhouse的什么机制会如此疯狂的消耗cache呢?我们再看看目录下有些什么类型的文件,截取了部分文件。
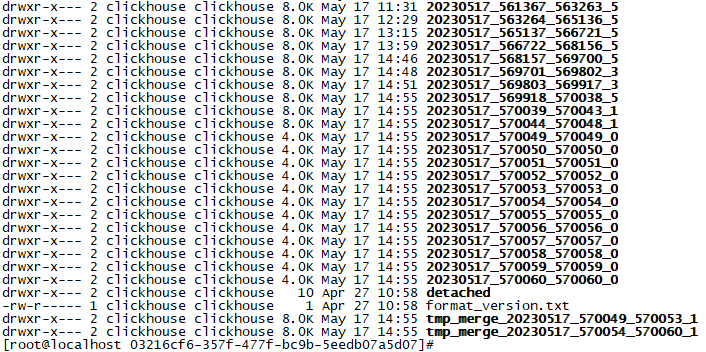
图17
发现目录下主要是很多以日期编号开头的目录文件,有纯数字组成的,也有带有merge字符的目录。随便打开一个5月17日当天的目录文件:20230517_563264_565136_5

图18
20230517_563264_565136_5 目录就占用了2GB cache,惊不惊喜意不意外?而且上面的所有文件,都完全加载到了cache中,比如在磁盘中占用743MB的文件cuid.bin,同样在cache中占用了742MB。

图19
查阅clickhouse资料后才发现,数字编号的目录都是clickhouse的很多分区part,clickhouse服务会根据相关策略自动的在后台合并这些分区。想想,如果在每一次合并分区时,才将上一次的某两个分区从磁盘进行IO读取,那将带来多大的性能开销。因此,clickhouse的开发者会将上一次的分区合并结果保存在cache里,下一次该分区与其它分区再次进行合并时,直接从内存里读取数据就好了。这就是为什么clickhouse消耗如此巨大cache的原因。当然,clickhouse对cache的消耗与您当前环境的数据存储规模呈正相关。
再来看一个问题,那昨天的所有分区,加载的数据还会保留在cache里吗?我找了一个昨天的分区,可以发现昨天的分区目录里的文件是不再占用cache的。上一天的分区,clickhouse认为是合并完成的分区,已经不需要再进行合并了,自然就clear了cache的占用,开发者也是想到了的。

图20
2、clickhouse cache耗费调整
可是当天分区消耗的cache,以及merge过程中使用的cache就让我没法玩了,尤其是在clickhouse服务并未独立部署的场景。那clickhouse自身可以支持改变这一机制吗?带着疑问又开始了一探究竟,完全没法停下来。
后来在clickhouse社区找到了一个可以节省cache使用的相关问题,有配置min_part_size_for_direct_merge,意思是超过min_part_size时,启用direct_io。也就是此时clickhouse会通过direct_io的方式读写merge的源文件和目的文件,而不是使用cache缓存,通过这种方式减少cache的使用。
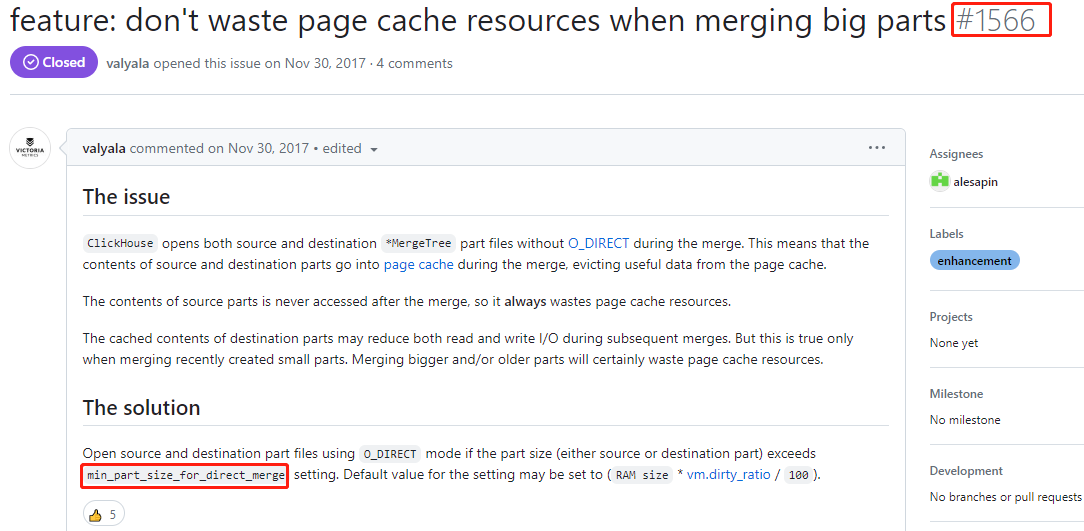
图21
我们的clickhouse版本比较高,看社区记录,clickhouse官方将之前的min_part_size_for_direct_merge改成为min_merge_bytes_to_use_direct_io,Minimal amount of bytes to enable O_DIRECT in merge (0 - disabled)。默认超过10GB时会使用direct_io的方式进行merge。

图22
那我将min_merge_bytes_to_use_direct_io设置足够小,甚至是1byte,是不是就可以完全避免对cache的使用了?答案是否定的,原因是:min_merge_bytes_to_use_direct_io只是读写表数据时使用了direct_io,替换了常用的buffer_io。也就是说只是在数据传输过程不使用cache,节省的是这个环节的cache内存消耗。merge完成后,先通过direct_io将数据写入到磁盘,同时会继续使用cache缓存merge完成后的数据,方便为下一次与其它分区进行快速merge做准备。因为每次merge都是merge旧数据与新数据,因此新合成的分区所使用的cache只会比merge前的更大。direct_io与buffer_io的区别如下图所示。

图23
需要注意的是,设置min_merge_bytes_to_use_direct_io还有一个副作用,当发生merge行为时会导致磁盘IO急剧拉高。因为direct_io是对磁盘进行直接操作,这种IO方式与buffer_io(使用了page cache做缓冲层)相比,带给磁盘的冲击更大。但是如果钞票比较多,可以做磁盘raid,或者增加了SSD,磁盘能够扛住direct_io冲击的同时,还能支持前端的丝滑查询,那就另当别论啦!

图24
另外还设置过相关参数:max_bytes_to_merge_at_max_space_in_pool,用处不大,就不继续介绍了,读者可以自行验证。只能说clickhouse当前没有提供待merge分区文件所占用cache的清理机制。
五、cache清理
一顿操作猛如虎,定睛一看原地杵。clickhouse自身无法限制cahce消耗;“echo 1 > /proc/sys/vm/drop_caches”又太粗暴,会清理掉其它进程加载到cache中的内容。只想搞掉clickhouse占用的大量cache,该怎么办?
有时候你不得不相信车到山前必有路,船到桥头自然直。再次请出vmtouch!vmtouch的help中有一个“-e”的选项,即“evict pages from memory”,顾名思义将page cache从内存中驱逐出去。既然vmtouch可以统计指定文件或目录占用的cache,那自然就可以实现对指定文件或目录的cahce清理!

图25
先来看看执行效果。执行前有内存分布,以及某个目录下cache的使用情况:

图26
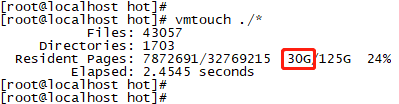
图27
执行:vmtouch -e ./* 后,内存分布如下图28所示。惊喜吗?刚好减少了某个目录下占用的30GB cache,同时free内存增加了30GB,实现了对指定目录cache消耗的定点清理!

图28
很好奇vmtouch实现指定目录内存清理的方法,去看了看源码,简单贴两张图就大致明白了。
1、传递指定path;
2、如果该path下无目录,则通过vmtouch_file函数执行cache的释放操作;如果该目录下存在其他文件(包括子目录),则遍历该目录下的所有文件,并通过vmtouch_crawl实现递归调用,回到第1步。

图29
那vmtouch_file函数如何实现cache的释放操作呢?答案就是通过系统调用:posix_fadvise,并使用POSIX_FADV_DONTNEED宏。定义如下:
1 int posix_fadvise(int fd, off_t offset, off_t len, int advice);
2
3 advice:
4 POSIX_FADV_DONTNEED,指定的数据在未来的一段时间内不会被访问,丢弃page cache中的数据
当advice为POSIX_FADV_DONTNEED时,内核会先将脏页刷盘,再清除相关page cache,从而达到cache释放的目的!
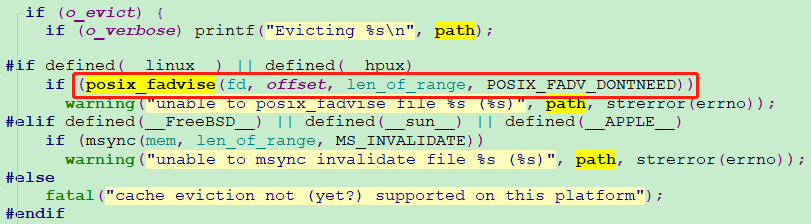
图30
但是查阅资料,发现 posix_fadvise 实现脏页刷盘使用的参数是:WB_SYNC_NONE,即posix_fadvise 不会同步等待其它进程发起的脏页刷盘行为,这可能会带来一个问题:不能完全释放指定路径下的cache,因此可以在执行cache释放前先使用 fsync,将所有的脏页进行回写,完成后再调用 posix_fadvise,实现指定path下所有cache的释放。如果不关心脏页使用的cache是否可以被全被释放,那直接使用posix_fadvise 就好了。
写到这里,可能有些读者会产生一个问题,清理cache就真的很好吗?答案是肯定的。为什么这么说呢,我想可以概括为以下两点:
一是有些服务使用完cache后,这部分cache再也不会被访问,这一类cache消耗当然是需要干掉的;
二是类似我们环境clickhouse这一类应用,它们会再次使用之前使用过的cache。这种情形确实不好办,但是如果不办它,最后就是大家都别玩了,鱼和熊掌不可兼得。因此,对这一类应用,定期清理cache是必要的,通过一个折中的办法让大家共存下来。对依赖cache这一类应用,cache清理后就只有辛苦下磁盘了(人在家中坐,锅从天上来)。
六、结语
摸索cache的过程曲折且漫长,还好最后找到了一个大家都可以接受的办法。文章篇幅比较长,简单总结一下全文吧,概括起来可归纳为以下四点:
- 验证了 hcache 无法统计cache的全面消耗情况,推荐了一种通过 lsof+fincore 探测进程中活跃目录以及文件的方法,并以此作为cache消耗的关键调查线索。这种方法适用于多种场景下的cache消耗调查,不仅仅是clickhosue。
- 通过vmtouch可以统计出某个文件、目录,甚至是嵌套目录下各文件真正使用cache的大小,从而明确cache消耗的分布情况。
- 分析了clickhouse大量消耗cache的原因,探索了clickhouse自身是否具备减少cache使用的能力和机制。
- 提供了清理各文件,或者各指定目录所占用cache的通用方法,属于定点清除的骚操作。
技术是不断实践积累的,在此分享出来与大家一起共勉!