深圳装修网站建设阿里云wordpress 安装目录
概要
深度学习网络的训练可能会很慢、也可能无法收敛,本文介绍使用keras进行深度神经网络训练的加速技巧,包括解决梯度消失和爆炸问题的策略(参数初始化策略、激活函数策略、批量归一化、梯度裁剪)、重用预训练层方法、更快的优化器算法,以及使用正则化避免过拟合的算法。
目录
一、梯度消失或者梯度爆炸
解法方案一:权重参数初始化
解决方案二:非饱和激活函数
解决方案三:批量归一化(Batch Normalization)
解决方案四:梯度裁剪
二、重用预训练层
例子:使用Keras进行迁移学习
三、更快的优化器
1. 动量优化
原始Momentum算法
Nesterov加速梯度
2. 自适应学习率算法
3. 学习率调度
四、通过正则化避免过拟合
L1和L2正则化
Dropout
最大范数正则化
五、实用指南
一、梯度消失或者梯度爆炸
梯度向下传播到较低层是,梯度通常会越来越小,结果是提督下降的更新导致较低层连接权重不变,训练不能收敛到一个良好的解,称为梯度消失;相反的情况是提督越来越大,各层需要更新很大的权重,直到算法发散,称为梯度爆炸。
梯度消失或者梯度爆炸是2000年代初期深度神经网络被抛弃的原因之一。
解法方案一:权重参数初始化
理论:每层大输出方差等于输入方差;反方向流经某层的之前和之后的梯度具有相同的方差,实际上很难满足,只能采取折中方案
主要有3种初始化策略:Xavier初始化或Glorot初始化、LeCun初始化、He初始化
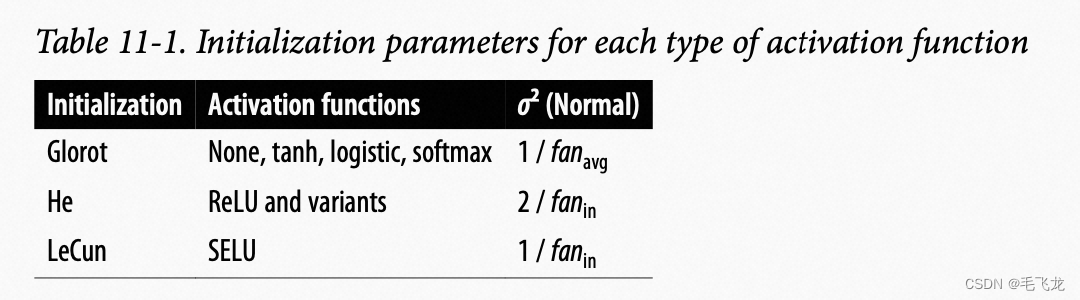
默认情况下,Keras使用均匀分布的Xavier初始化,通过kernel_initializer进行设置
keras.layers.Dense(10, activation="relu", kernel_initializer="he_normal")解决方案二:非饱和激活函数
sigmoid函数存在饱和区,容易导致梯度消失问题
ReLU函数通常比sigmoid函数表现要好,但在输入小于0时,梯度是0,输出一直是0,导致这些神经元“死亡”了,严重的情况可能出现一般的神经元“死亡”。
ReLU变体LeakyReLU,在输入小于0时,为一个小斜率直线,LeakyReLU=max(az,z)。

ReLU函数变体 ELU(Exponential Linear Unit,指数线型单位)

SELU(Scaled ELU)为ELU的变体,即加入一个参数lamda,使得使用该激活函数,网络时自动归一化的 :

相比ReLU函数,ELU的主要问题是计算速度较慢
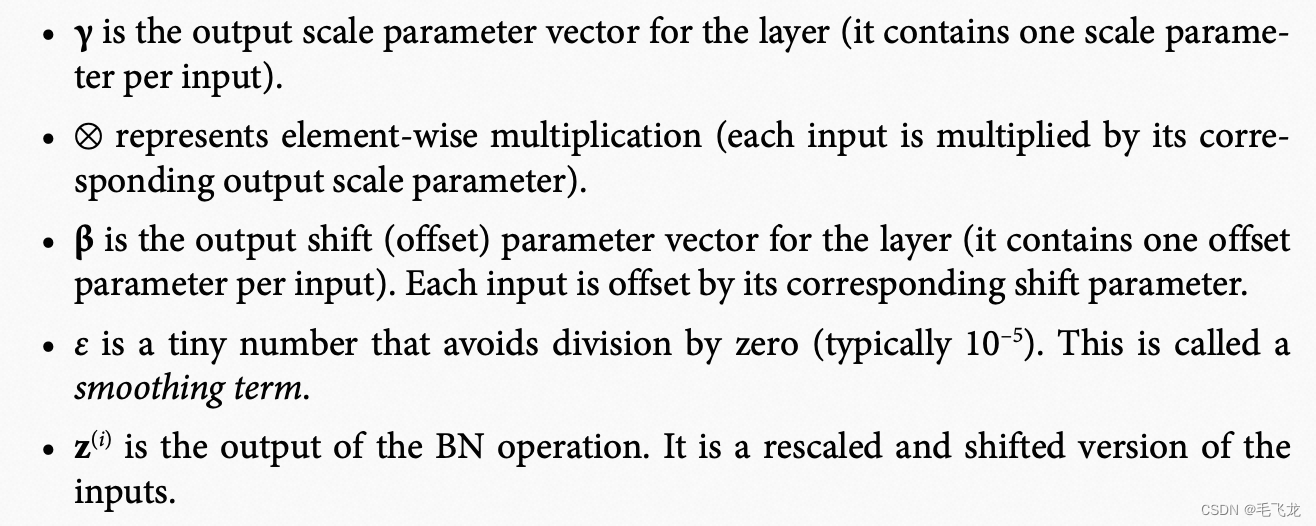
解决方案三:批量归一化(Batch Normalization)
尽管权重参数初始化策略和激活函数策略可以缓解梯度消失和爆炸问题,但仍然会出现,这个时候,通过BN可以减少这个问题,且使得可以使用饱和激活函数。
BN层对于浅层网络可能效果不明显,但对于深层网络非常有用

解决方案四:梯度裁剪
对于梯度在反向传播期间设定一个阈值,使得梯度不超过该阈值,称为梯度裁剪,可缓解梯度爆炸问题,通常用在RNN中,原因是RNN中难以使用BN。
实现方法为在创建优化器是设置clipvalue或者clipnorm。
optimizer = keras.optimizers.SGD(clipvalue=1.0) model.compile(loss="mse", optimizer=optimizer)上述代码将限制所有的梯度再-1到1之间,这种设置可能会改变梯度的方向,比如原始梯度向量为[0.9,100.0],梯度主要指向第二个轴方向,按梯度裁剪后,得到[0.9,1.0],基本指向两个轴对角线。要想不改变梯度方向,则应该使用clipnorm进行裁剪,比如clipnorm=1.0,则得到梯度向量为[0.009,0.999]
二、重用预训练层
从头开始训练非常大的DNN通常不是一个好的主意,试图找到一个与现有问题类似的神经网络,然后用该网络的较低层,此技术称为迁移学习。它能够大大的加快训练速度,减少对训练数据的要求。
假设你可以访问一个经过训练的DNN,将图片分为100个不同类别,其中包括动物、植物和车辆。现在需要训练DNN来对特质类型的车辆进行分类,这些任务非常相似,因此应该尝试利用第一个网络中的一部分。
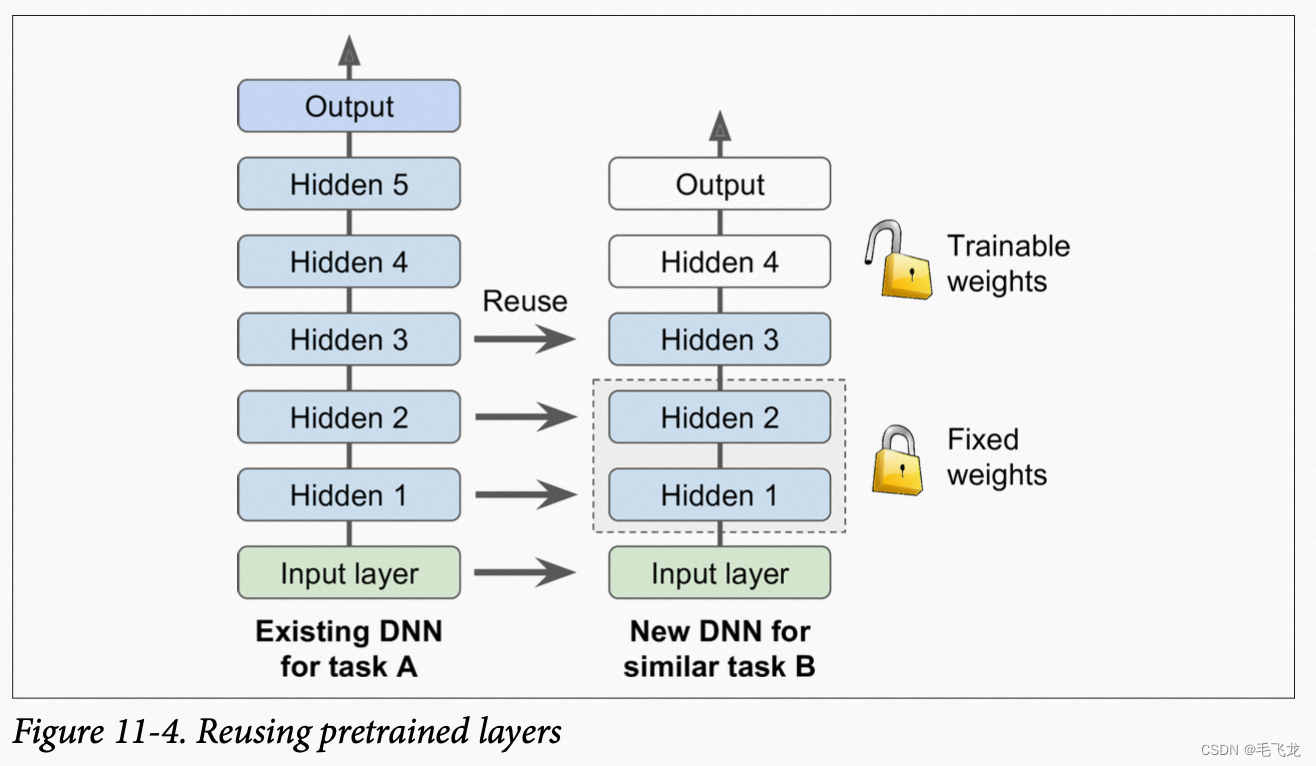
通常应该替换掉原始模型的输出层而保留较底层,因为对于新的任务有用的高级特征可能与原始任务存在很大的区别,甚至对于新的任务,没有正确数量的输出,任务约相似,保留的隐藏层就越多。
例子:使用Keras进行迁移学习
假设Fashion MNIST数据集仅仅包括8个类别(除了凉鞋和衬衫之外的所有类别),有人在该数据集上训练了Keras模型,并且获得了相当不错的性能(精度>90%),我们称此模型为A。
现在需要处理另外一项任务,要训练一个二分类器(正例=衬衫,负例=凉鞋),但数据集非常小,只有200张图片。你意识到新任务和任务A非常相似,也许可以通过迁移学习会有所帮助,让我们看看该怎么做。
首先,我们需要加载模型A并基于该模型层创建一个新模型,我们重用除输出层之外的所有层。
# 对模型A进行克隆,这样在训练模型B_on_A的时候,不回对模型的参数进行修改
model_A_clone = keras.models.clone_model(model_A)
model_A_clone.set_weights(model_A.get_weights())model_B_on_A = keras.models.Sequential(model_A_clone.layers[:-1]) # 去除模型A的输出层
model_B_on_A.add(keras.layers.Dense(1, activation="sigmoid")) # 增加新模型的输出层# 由于新的输出层是随机初始化的,在最初的几个轮次中会产生较大的错误,存在较大的错误梯度,这会破坏重用的权重。为避免这种情况,在前几个轮次的训练时,冻结重用层,给新层一些时间来学习合理权重,为此将重用层的训练属性设置为False。for layer in model_B_on_A.layers[:-1]: layer.trainable = Falsemodel_B_on_A.compile(loss="binary_crossentropy",optimizer=keras.optimizers.SGD(learning_rate=1e-3),metrics=["accuracy"])history = model_B_on_A.fit(X_train_B, y_train_B, epochs=4,validation_data=(X_valid_B, y_valid_B))# 几轮训练后,可以对重用层进行解冻,参数可以更新for layer in model_B_on_A.layers[:-1]:layer.trainable = Truemodel_B_on_A.compile(loss="binary_crossentropy",optimizer=keras.optimizers.SGD(learning_rate=1e-3),metrics=["accuracy"])
history = model_B_on_A.fit(X_train_B, y_train_B, epochs=16,validation_data=(X_valid_B, y_valid_B))
三、更快的优化器
训练一个非常大的神经网络可能会非常缓慢,前面已经知道了五种加速训练的方法:
- 权重参数初始化
- 使用良好的激活函数
- 批量归一化
- 梯度裁剪
- 重用预训练网络中的一部分
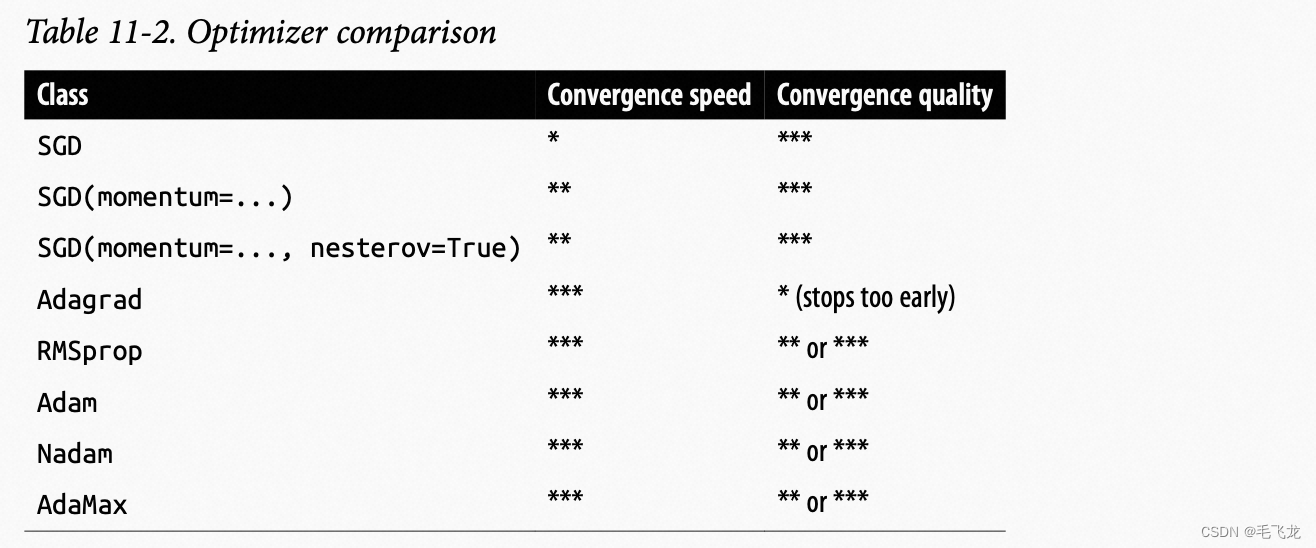
与常规的梯度下降相比,使用更快的有花期也可以带来巨大的速度提升,包括动量优化算法:原始动量优化和Nesterov加速梯度,以及自适应学习率优化:AdaGrad、RMSProp、Adam、Nadam。
1. 动量优化
参考这两篇文章:机器学习 | 优化——动量优化法(更新方向优化) - 简书
优化算法Optimizer比较和总结 - 知乎
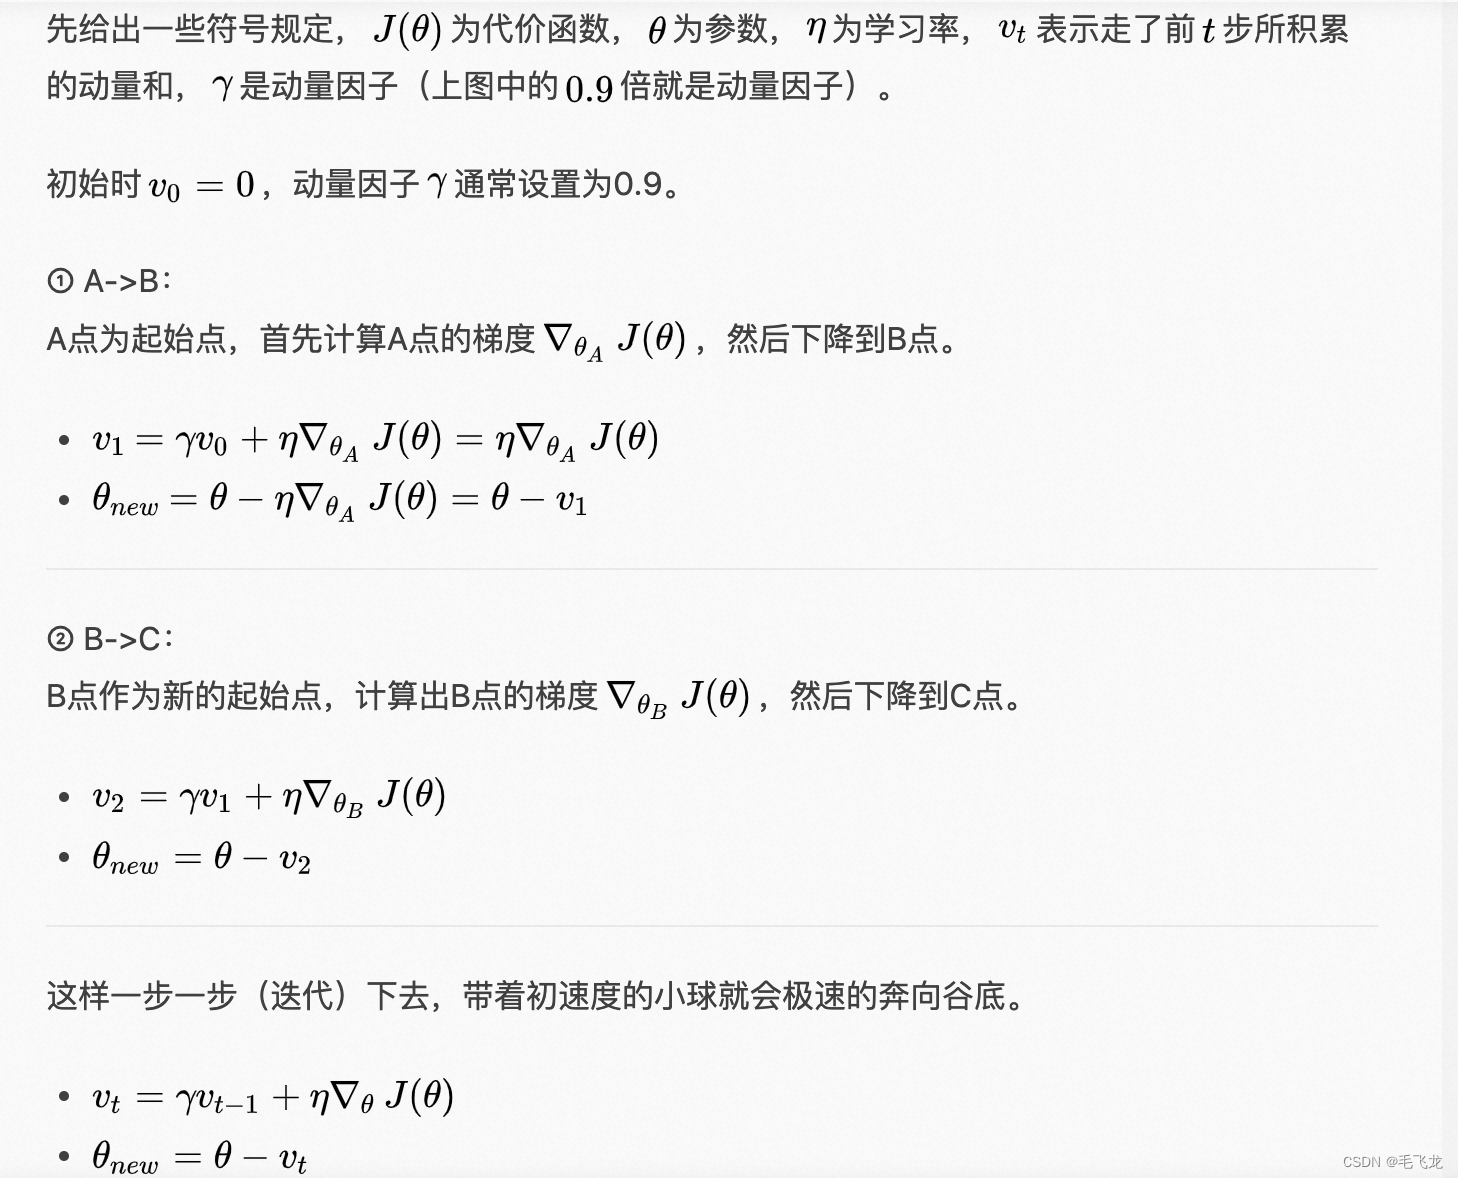
momentum算法思想:权重参数更新时在一定程度上保留之前更新的方向,同时又利用当前batch的梯度微调最终的更新方向,简言之就是通过积累之前的动量来加速当前的梯度。
原始Momentum算法
下面一张图可以很直观地表达Momentum算法的思想。举个简单例子,假设上次更新时梯度是往前走的,这次更新的梯度算出来是往左走,这变化太剧烈了,所以我们来做个折中,往左前方走。感觉上,像是上次更新还带有一定的惯性。

具体算法如下:
Momentum算法的优点:
当某个参数在最近一段时间内的梯度方向不一致时,其真实的参数更新幅度变小;相反,当在最近一段时间内的梯度方向都一致时,其真实的参数更新幅度变大,起到加速作用。
一般而言,在迭代初期,梯度方向都比较一致,动量法会起到加速作用,可以更快地到达最优点。在迭代后期,梯度方向会取决不一致,在收敛值附近震荡,动量法会起到减速作用,增加稳定性。从某种角度来说,当前梯度叠加上部分的上次梯度,一定程度上可以近似看作二阶梯度。
——参考:邱锡鹏:《神经网络与深度学习》
Nesterov加速梯度
Nesterov 加速梯度(Nesterov Accelerated Gradient,NAG),也叫 Nesterov 动量法(Nesterov Momentum),是对Momentum算法的一种改进,可以看成是Momentum算法的一种 变体。
动量法每下降一步都是由前面下降方向的一个累积和当前点的梯度方向组合而成。于是一位大神(Nesterov)就开始思考,既然每一步都要将两个梯度方向(历史梯度、当前梯度)做一个合并再下降,那为什么不先按照历史梯度往前走那么一小步,按照前面一小步位置的“超前梯度”来做梯度合并呢?
如此一来,小球就可以先不管三七二十一先往前走一步,在靠前一点的位置看到梯度,然后按照那个位置再来修正这一步的梯度方向。
2. 自适应学习率算法
学习率是一个非常重要的超参数,但是学习率是非常难确定的,虽然可以通过多次训练来确定合适的学习率,但是一般也不太确定多少次训练能够得到最优的学习率,玄学事件,对人为的经验要求比较高,所以是否存在一些策略自适应地调节学习率的大小,从而提高训练速度。 目前的自适应学习率优化算法主要有:AdaGrad算法,RMSProp算法,Adam算法以及AdaDelta算法。
AdaGrad(Adaptive Gradient)算法:梯度更新时,要除以“梯度的累积平方和根”,因此梯度前期更新较快,中后期,分母上梯度累加的平方和会越来越大,使得参数更新量趋近于0,使得训练提前结束。
RMSProp(Root Mean Square Propagation)算法:梯度更新时,“梯度的累积平方和根”会进行衰减,最近一步“梯度平方和根”有一定权重。
Adam(Adaptive Moment estimation) 算法:结合了动量优化和RMSProp思想,像动量优化一样,跟踪梯度指数衰减,像RMSProp一样,关注梯度平方和根的衰减。
3. 学习率调度
一般可以先设置较大的学习率,然后逐步降低学习率,以使得模型快速收敛。主要有幂调度、指数调度、分段恒定调度、性能调度、周期调度几种方法。
幂调度:将学习率设置为lr = lr0 / (1 + steps / s)**c(,Keras uses )
c=1,经过s个步骤之后,学习率下降为原来的1/2,在keras实现幂调度非常简单
initial_learning_rate = 0.1
decay_steps = 10.0
decay_rate = 0.5
learning_rate_fn = keras.optimizers.schedules.InverseTimeDecay(initial_learning_rate, decay_steps, decay_rate)
optimizer = tf.keras.optimizers.SGD(learning_rate = learning_rate_fn)
指数调度:
分段恒定调度:对于一定的轮次使用一个固定的学习率,比如前5个轮次使用0.1,6-20轮次使用0.05,21轮次以后使用0.01,以此类推。可以使用keras.optimizers.schedules.PiecewiseConstantDecay
step = tf.Variable(0, trainable=False)
boundaries = [5, 20]
values = [0.1, 0.05, 0.1]
learning_rate_fn = keras.optimizers.schedules.PiecewiseConstantDecay(boundaries, values)# Later, whenever we perform an optimization step, we pass in the step.
learning_rate = learning_rate_fn(step)性能调度:每N步测量一次验证误差,并且当误差停止下降时,讲学习率降低lamda倍。
四、通过正则化避免过拟合
L1和L2正则化
keras可以使用keras.regularizers.l1()、keras.regularizers.l2()、keras.regularizers.l1-l2()来分别实现l1、l2、以及l1+l2正则化。
model = keras.models.Sequential([keras.layers.Flatten(input_shape=[28, 28]),keras.layers.Dense(300, activation="elu",kernel_initializer="he_normal",kernel_regularizer=keras.regularizers.l2(0.01)),keras.layers.Dense(100, activation="elu",kernel_initializer="he_normal",kernel_regularizer=keras.regularizers.l2(0.01)),keras.layers.Dense(10, activation="softmax",kernel_regularizer=keras.regularizers.l2(0.01))
])
由于通常需要将相同的正则化应用于网络中的所有层,上述方法重复了相同的参数切容易出错,可以考虑使用python 的functools.partial()函数
from functools import partialRegularizedDense = partial(keras.layers.Dense,activation="elu",kernel_initializer="he_normal",kernel_regularizer=keras.regularizers.l2(0.01))model = keras.models.Sequential([keras.layers.Flatten(input_shape=[28, 28]),RegularizedDense(300),RegularizedDense(100),RegularizedDense(10, activation="softmax")
])
Dropout
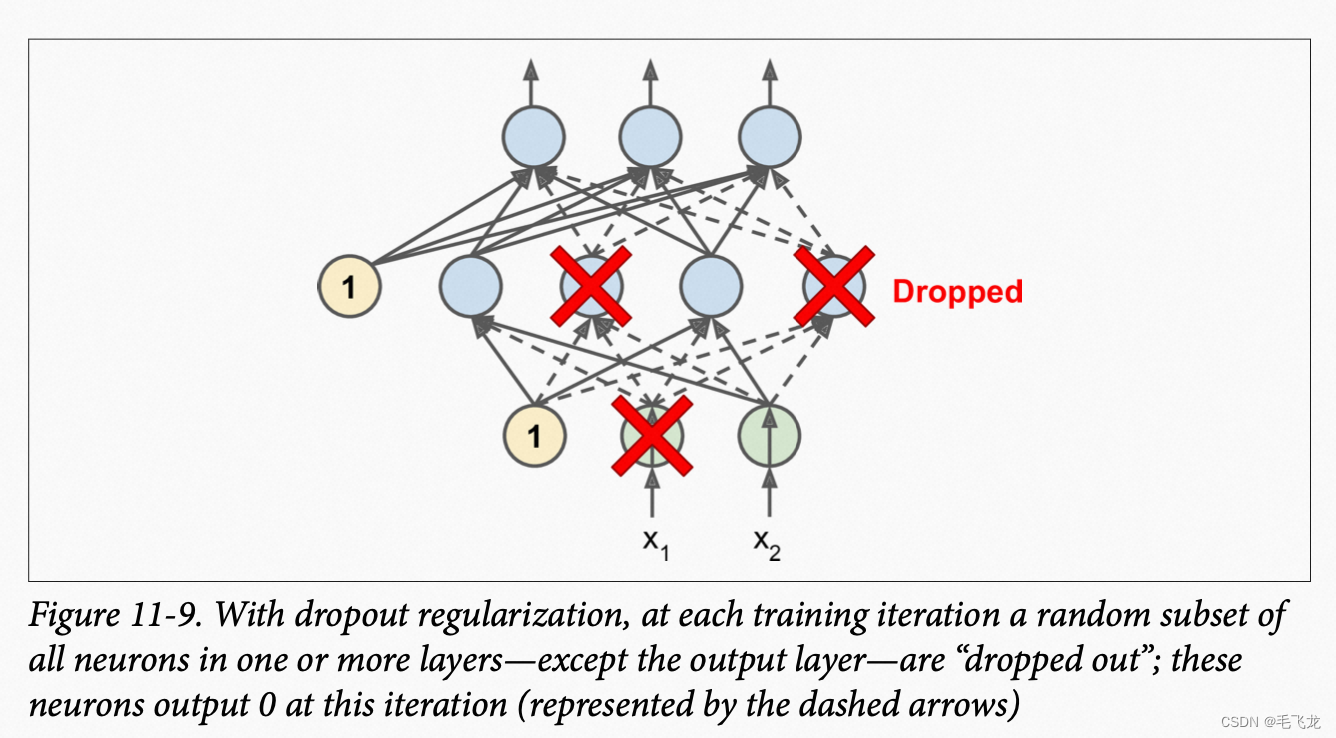
对深度学习,dropout是最受欢迎的正则化技术之一,由Geoffrey Hinton在2012年提出。在每个训练步骤中,每个神经元(不包括输出神经元)都有暂时被“删除”的概率p,但在下一步骤中可能处于激活状态,超参数p称为dropout率,一般设置为10%到50%。dropout只能用于训练,不会用于预测,因此在悬链完后,我们需要将每个输入权重乘以保留概率1-p。
model = keras.models.Sequential([keras.layers.Flatten(input_shape=[28, 28]),keras.layers.Dropout(rate=0.2),keras.layers.Dense(300, activation="elu", kernel_initializer="he_normal"),keras.layers.Dropout(rate=0.2),keras.layers.Dense(100, activation="elu", kernel_initializer="he_normal"),keras.layers.Dropout(rate=0.2),keras.layers.Dense(10, activation="softmax")
])
model.compile(loss="sparse_categorical_crossentropy", optimizer="nadam", metrics=["accuracy"])
n_epochs = 2
history = model.fit(X_train_scaled, y_train, epochs=n_epochs,validation_data=(X_valid_scaled, y_valid))
最大范数正则化
对每个神经元,限制传入链接的权重W,使得, r称为最大范数超参数。最大范数正则化不会正则化损失添加到总体损失中,而是在每个训练步骤后,计算
,如果大于r,则进行缩放。
五、实用指南
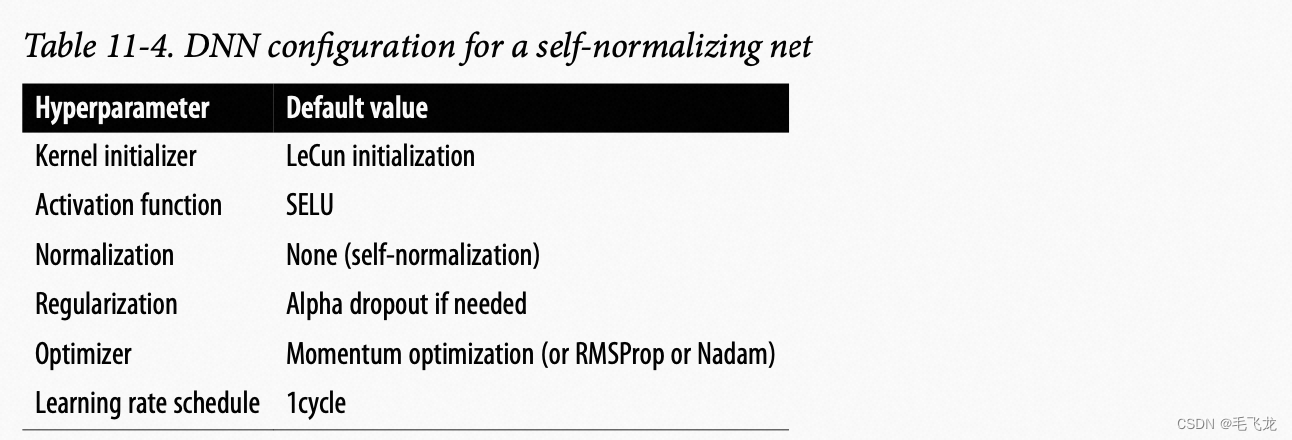
默认DNN超参数配置
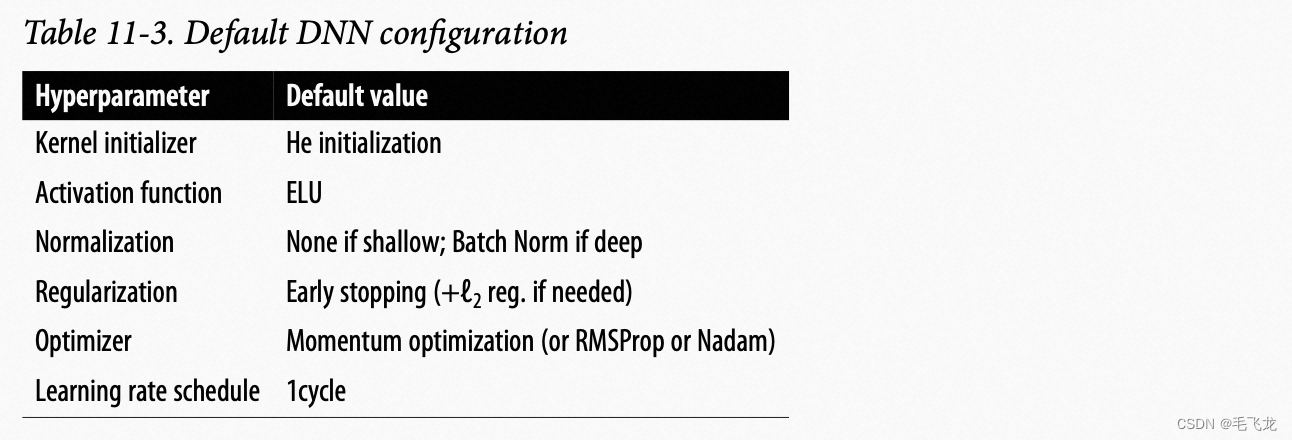
如果网络时密集层的简单堆叠,可以使用自归一化,可以使用下表的参数配置
自归一化网络的DNN配置