湖北襄阳住房保障和城市建设局网站线上商城怎么开
字符串是 Python 中最常用的数据类型。我们可以使用引号( ’ 或 " )来创建字符串。
创建字符串很简单,只要为变量分配一个值即可。例如:
var1 = 'Hello World!'
var2 = "Tarzan"
Python 访问字符串中的值
Python 不支持单字符类型,单字符在 Python 中也是作为一个字符串使用。
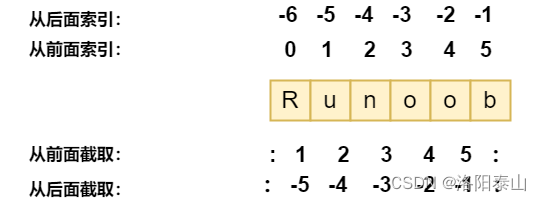
Python 访问子字符串,可以使用方括号 [] 来截取字符串,字符串的截取的语法格式如下:
变量[头下标:尾下标]
索引值以 0 为开始值,-1 为从末尾的开始位置。
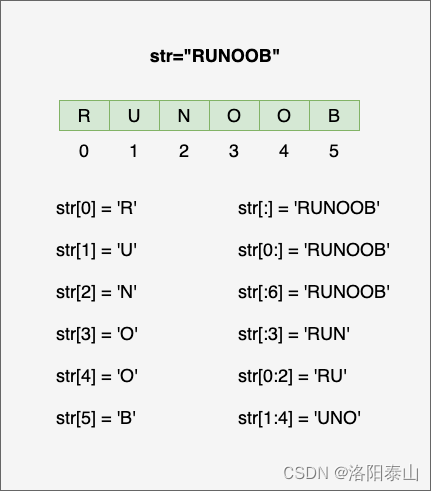
如下实例:
var1 = 'Hello World!'
var2 = "Tarzan"print ("var1[0]: ", var1[0])
print ("var2[1:5]: ", var2[1:5])
以上实例执行结果:
var1[0]: H
var2[1:5]: arza
Python 字符串拼接
你可以截取字符串的一部分并与其他字段拼接,如下实例:
var1 = 'Hello World!'print ("已更新字符串 : ", var1[:6] + 'Runoob!')
以上实例执行结果
已更新字符串 : Hello Runoob!
Python 转义字符
在需要在字符中使用特殊字符时,python 用反斜杠 \ 转义字符。如下表:
| 转义字符 | 描述 | 实例 |
|---|---|---|
| (在行尾时) | 续行符 | >>> print(“line1 \ … line2 \ … line3”) line1 line2 line3 >>> |
| \\ | 反斜杠符号 | >>> print(“\ \”) \ |
| ’ | 单引号 | >>> print(‘\’‘) ’ |
| " | 双引号 | >>> print(“\”“) ” |
| \a | 响铃 | >>> print(“\a”) 执行后电脑有响声。 |
| \b | 退格(Backspace) | >>> print(“Hello \b World!”) Hello World! |
| \000 | 空 | >>> print(“\000”) >>> |
| \n | 换行 | >>> print(“\n”) >>> |
| \v | 纵向制表符 | >>> print(“Hello \v World!”) Hello World! >>> |
| \t | 横向制表符 | >>>print(“Hello \t World!”) Hello World! >>> |
| \r | 回车,将 \r 后面的内容移到字符串开头,并逐一替换开头部分的字符,直至将 \r 后面的内容完全替换完成。 | >>> print(“Hello\rWorld!”) World! >>> print(‘google tarzan taobao\r123456’) 123456 tarzan taobao |
| \f | 换页 | >>> print(“Hello \f World!”) Hello World! >>> |
| \yyy | 八进制数,y 代表 0~7 的字符,例如:\012 代表换行。 | >>>print(“\110\145\154\154\157\40\127\157\162\154\144\41”) Hello World! |
| \xyy | 十六进制数,以 \x 开头,y 代表的字符,例如:\x0a 代表换行 | >>>print(“\x48\x65\x6c\x6c\x6f\x20\x57\x6f\x72\x6c\x64\x21”) Hello World! |
| \other | 其它的字符以普通格式输出 |
使用 \r 实现百分比精度:
import timefor i in range(101):print("\r{:3}%".format(i),end=' ')time.sleep(0.05)
以下实例,我们使用了不同的转义字符来演示单引号、换行符、制表符、退格符、换页符、ASCII、二进制、八进制数和十六进制数的效果:
print('\'Hello, world!\'')  # 输出:'Hello, world!'print("Hello, world!\nHow are you?")  # 输出:Hello, world!#       How are you?print("Hello, world!\tHow are you?")  # 输出:Hello, world!    How are you?print("Hello,\b world!")  # 输出:Hello world!print("Hello,\f world!")  # 输出:# Hello,#  world!print("A 对应的 ASCII 值为:", ord('A'))  # 输出:A 对应的 ASCII 值为: 65print("\x41 为 A 的 ASCII 代码")  # 输出:A 为 A 的 ASCII 代码decimal_number = 42
binary_number = bin(decimal_number)  # 十进制转换为二进制
print('转换为二进制:', binary_number)  # 转换为二进制: 0b101010octal_number = oct(decimal_number)  # 十进制转换为八进制
print('转换为八进制:', octal_number)  # 转换为八进制: 0o52hexadecimal_number = hex(decimal_number)  # 十进制转换为十六进制
print('转换为十六进制:', hexadecimal_number) # 转换为十六进制: 0x2a
Python 字符串运算符
下表实例变量 a 值为字符串 “Hello”,b 变量值为 “Python”:
| 操作符 | 描述 | 实例 |
|---|---|---|
| + | 字符串连接 | a + b 输出结果: HelloPython |
| * | 重复输出字符串 | a*2 输出结果:HelloHello |
| [] | 通过索引获取字符串中字符 | a[1] 输出结果 e |
| [ : ] | 截取字符串中的一部分,遵循左闭右开原则,str[0:2] 是不包含第 3 个字符的。 | a[1:4] 输出结果 ell |
| in | 成员运算符 - 如果字符串中包含给定的字符返回 True | ‘H’ in a 输出结果 True |
| not in | 成员运算符 - 如果字符串中不包含给定的字符返回 True ‘M’ not in | a 输出结果 True |
| r/R | 原始字符串 - 原始字符串:所有的字符串都是直接按照字面的意思来使用,没有转义特殊或不能打印的字符。 原始字符串除在字符串的第一个引号前加上字母 r(可以大小写)以外,与普通字符串有着几乎完全相同的语法。 | print( r’\n’ ) print( R’\n’ ) |
| % | 格式字符串 | 内容有点多,下面会详细讲 |
a = "Hello"
b = "Python"print("a + b 输出结果:", a + b)
print("a * 2 输出结果:", a * 2)
print("a[1] 输出结果:", a[1])
print("a[1:4] 输出结果:", a[1:4])if( "H" in a) :print("H 在变量 a 中")
else :print("H 不在变量 a 中")if( "M" not in a) :print("M 不在变量 a 中")
else :print("M 在变量 a 中")print (r'\n')
print (R'\n')
以上实例输出结果为:
a + b 输出结果: HelloPython
a * 2 输出结果: HelloHello
a[1] 输出结果: e
a[1:4] 输出结果: ell
H 在变量 a 中
M 不在变量 a 中
\n
\n
Python 字符串格式化
Python 支持格式化字符串的输出 。尽管这样可能会用到非常复杂的表达式,但最基本的用法是将一个值插入到一个有字符串格式符 %s 的字符串中。
在 Python 中,字符串格式化使用与 C 中 sprintf 函数一样的语法。
print ("我叫 %s 今年 %d 岁!" % ('小明', 10))
以上实例输出结果:
我叫 小明 今年 10 岁!
python字符串格式化符号:
| 符 号 | 描述 |
|---|---|
| %c | 格式化字符及其ASCII码 |
| %s | 格式化字符串 |
| %d | 格式化整数 |
| %u | 格式化无符号整型 |
| %o | 格式化无符号八进制数 |
| %x | 格式化无符号十六进制数 |
| %X | 格式化无符号十六进制数(大写) |
| %f | 格式化浮点数字,可指定小数点后的精度 |
| %e | 用科学计数法格式化浮点数 |
| %E | 作用同%e,用科学计数法格式化浮点数 |
| %g | %f和%e的简写 |
| %G | %f 和 %E 的简写 |
| %p | 用十六进制数格式化变量的地址 |
格式化操作符辅助指令:
| 符号 | 功能 |
|---|---|
| * | 定义宽度或者小数点精度 |
| - | 用做左对齐 |
| + | 在正数前面显示加号( + ) |
| 在正数前面显示空格 | |
| # | 在八进制数前面显示零(‘0’),在十六进制前面显示’0x’或者’0X’(取决于用的是’x’还是’X’) |
| 0 | 显示的数字前面填充’0’而不是默认的空格 |
| % | ‘%%‘输出一个单一的’%’ |
| (var) | 映射变量(字典参数) |
| m.n. | m 是显示的最小总宽度,n 是小数点后的位数(如果可用的话) |
- Python2.6 开始,新增了一种格式化字符串的函数 str.format(),它增强了字符串格式化的功能。
Python三引号
python三引号允许一个字符串跨多行,字符串中可以包含换行符、制表符以及其他特殊字符。实例如下
para_str = """这是一个多行字符串的实例
多行字符串可以使用制表符
TAB ( \t )。
也可以使用换行符 [ \n ]。
"""
print (para_str)
以上实例执行结果为:
这是一个多行字符串的实例
多行字符串可以使用制表符
TAB ( )。
也可以使用换行符 [
]。
三引号让程序员从引号和特殊字符串的泥潭里面解脱出来,自始至终保持一小块字符串的格式是所谓的WYSIWYG(所见即所得)格式的。
一个典型的用例是,当你需要一块HTML或者SQL时,这时用字符串组合,特殊字符串转义将会非常的繁琐。
errHTML = '''
<HTML><HEAD><TITLE>
Friends CGI Demo</TITLE></HEAD>
<BODY><H3>ERROR</H3>
<B>%s</B><P>
<FORM><INPUT TYPE=button VALUE=Back
ONCLICK="window.history.back()"></FORM>
</BODY></HTML>
'''
cursor.execute('''
CREATE TABLE users (
login VARCHAR(8),
uid INTEGER,
prid INTEGER)
''')
f-string
f-string 是 python3.6 之后版本添加的,称之为字面量格式化字符串,是新的格式化字符串的语法。
之前我们习惯用百分号 (%):
>>> name = 'Tarzan'
>>> 'Hello %s' % name
'Hello Tarzan'
f-string 格式化字符串以 f 开头,后面跟着字符串,字符串中的表达式用大括号 {} 包起来,它会将变量或表达式计算后的值替换进去,实例如下:
>>> name = 'Tarzan'
>>> f'Hello {name}'  # 替换变量
'Hello Tarzan'
>>> f'{1+2}'         # 使用表达式
'3'>>> w = {'name': 'Tarzan', 'url': 'www.Tarzan.com'}
>>> f'{w["name"]}: {w["url"]}'
'Tarzan: www.Tarzan.com'
用了这种方式明显更简单了,不用再去判断使用 %s,还是 %d。
在 Python 3.8 的版本中可以使用 = 符号来拼接运算表达式与结果:
>>> x = 1
>>> print(f'{x+1}')   # Python 3.6
2>>> x = 1
>>> print(f'{x+1=}')   # Python 3.8
x+1=2
Unicode 字符串
在Python2中,普通字符串是以8位ASCII码进行存储的,而Unicode字符串则存储为16位unicode字符串,这样能够表示更多的字符集。使用的语法是在字符串前面加上前缀 u。
在Python3中,所有的字符串都是Unicode字符串。
Python 的字符串内建函数
Python 的字符串常用内建函数如下:
| 方法 | 描述 |
|---|---|
| capitalize() | 将字符串的第一个字符转换为大写 |
| center(width, fillchar) | 返回一个指定的宽度 width 居中的字符串,fillchar 为填充的字符,默认为空格。 |
| count(str, beg= 0,end=len(string)) | 返回 str 在 string 里面出现的次数,如果 beg 或者 end 指定则返回指定范围内 str 出现的次数 |
| bytes.decode(encoding=“utf-8”, errors=“strict”) | Python3 中没有 decode 方法,但我们可以使用 bytes 对象的 decode() 方法来解码给定的 bytes 对象,这个 bytes 对象可以由 str.encode() 来编码返回。 |
| encode(encoding=‘UTF-8’,errors=‘strict’) | 以 encoding 指定的编码格式编码字符串,如果出错默认报一个ValueError 的异常,除非 errors 指定的是’ignore’或者’replace’ |
| endswith(suffix, beg=0, end=len(string)) | 检查字符串是否以 suffix 结束,如果 beg 或者 end 指定则检查指定的范围内是否以 suffix 结束,如果是,返回 True,否则返回 False。 |
| expandtabs(tabsize=8) | 把字符串 string 中的 tab 符号转为空格,tab 符号默认的空格数是 8 。 |
| find(str, beg=0, end=len(string)) | 检测 str 是否包含在字符串中,如果指定范围 beg 和 end ,则检查是否包含在指定范围内,如果包含返回开始的索引值,否则返回-1 |
| index(str, beg=0, end=len(string)) | 跟find()方法一样,只不过如果str不在字符串中会报一个异常。 |
| isalnum() | 如果字符串至少有一个字符并且所有字符都是字母或数字则返 回 True,否则返回 False |
| isalpha() | 如果字符串至少有一个字符并且所有字符都是字母或中文字则返回 True, 否则返回 False |
| isdigit() | 如果字符串只包含数字则返回 True 否则返回 False… |
| islower() | 如果字符串中包含至少一个区分大小写的字符,并且所有这些(区分大小写的)字符都是小写,则返回 True,否则返回 False |
| isnumeric() | 如果字符串中只包含数字字符,则返回 True,否则返回 False |
| isspace() | 如果字符串中只包含空白,则返回 True,否则返回 False. |
| istitle() | 如果字符串是标题化的(见 title())则返回 True,否则返回 False |
| isupper() | 如果字符串中包含至少一个区分大小写的字符,并且所有这些(区分大小写的)字符都是大写,则返回 True,否则返回 False |
| join(seq) | 以指定字符串作为分隔符,将 seq 中所有的元素(的字符串表示)合并为一个新的字符串 |
| len(string) | 返回字符串长度 |
| ljust(width[, fillchar]) | 返回一个原字符串左对齐,并使用 fillchar 填充至长度 width 的新字符串,fillchar 默认为空格。 |
| lower() | 转换字符串中所有大写字符为小写. |
| lstrip() | 截掉字符串左边的空格或指定字符。 |
| maketrans() | 创建字符映射的转换表,对于接受两个参数的最简单的调用方式,第一个参数是字符串,表示需要转换的字符,第二个参数也是字符串表示转换的目标。 |
| max(str) | 返回字符串 str 中最大的字母。 |
| min(str) | 返回字符串 str 中最小的字母。 |
| replace(old, new [, max]) | 把 将字符串中的 old 替换成 new,如果 max 指定,则替换不超过 max 次。 |
| rfind(str, beg=0,end=len(string)) | 类似于 find()函数,不过是从右边开始查找. |
| rindex( str, beg=0, end=len(string)) | 类似于 index(),不过是从右边开始. |
| rjust(width,[, fillchar]) | 返回一个原字符串右对齐,并使用fillchar(默认空格)填充至长度 width 的新字符串 |
| rstrip() | 删除字符串末尾的空格或指定字符。 |
| split(str=“”, num=string.count(str)) | 以 str 为分隔符截取字符串,如果 num 有指定值,则仅截取 num+1 个子字符串 |
| splitlines([keepends]) | 按照行(‘\r’, ‘\r\n’, \n’)分隔,返回一个包含各行作为元素的列表,如果参数 keepends 为 False,不包含换行符,如果为 True,则保留换行符。 |
| startswith(substr, beg=0,end=len(string)) | 检查字符串是否是以指定子字符串 substr 开头,是则返回 True,否则返回 False。如果beg 和 end 指定值,则在指定范围内检查。 |
| strip([chars]) | 在字符串上执行 lstrip()和 rstrip() |
| swapcase() | 将字符串中大写转换为小写,小写转换为大写 |
| title() | 返回"标题化"的字符串,就是说所有单词都是以大写开始,其余字母均为小写(见 istitle()) |
| translate(table, deletechars=“”) | 根据 table 给出的表(包含 256 个字符)转换 string 的字符, 要过滤掉的字符放到 deletechars 参数中 |
| upper() | 转换字符串中的小写字母为大写 |
| zfill (width) | 返回长度为 width 的字符串,原字符串右对齐,前面填充0 |
| isdecimal() | 检查字符串是否只包含十进制字符,如果是返回 true,否则返回 false。 |