做网站建设的电话销售海南平台网站建设平台
文章目录
- TCP
- TCP协议段格式
- 报头和有效载荷如何分离?
- 4位首部长度
- TCP可靠性
- 确认应答机制的提出
- 序号和确认序号
- 为什么序号和确认序号在不同的字段?
- 16位窗口大小
- 6个标志位
- 标志位本质
- 具体标志位
- PSH
- RST
- URG
- 超时重传机制
文章目录
- TCP
- TCP协议段格式
- 报头和有效载荷如何分离?
- 4位首部长度
- TCP可靠性
- 确认应答机制的提出
- 序号和确认序号
- 为什么序号和确认序号在不同的字段?
- 16位窗口大小
- 6个标志位
- 标志位本质
- 具体标志位
- PSH
- RST
- URG
- 超时重传机制
文章目录
- TCP
- TCP协议段格式
- 报头和有效载荷如何分离?
- 4位首部长度
- TCP可靠性
- 确认应答机制的提出
- 序号和确认序号
- 为什么序号和确认序号在不同的字段?
- 16位窗口大小
- 6个标志位
- 标志位本质
- 具体标志位
- PSH
- RST
- URG
- 超时重传机制
TCP
TCP协议段格式

TCP报文 等于报头 加 有效载荷
TCP的标准报头长度 整体为20字节
报头的宽度是0-31,表示报头所对应的字节数 (4字节)报文对应的宽度 为0-31
有效的标准报头长度一共 5行,所以 整体为20字节
选项
如:客户端和服务器建立好了链接,但这个链接长时间不关,并且也不发数据,所以 操作系统 就会使用一定的策略
保证链接在一定时间内自动断开
报头和有效载荷如何分离?
考虑两种情况
第一种 没有选项时
标准报头的长度为20字节,剩下的都是有效载荷
第二种 有选项时
将标准报头长度20字节 与选项大小去掉,剩下的就是 有效载荷
所以就需要借助4位首部长度,来确定是否存在选项
若不存在选项,则使用第一种方法
若存在选项,则使用第二种方法
4位首部长度
TCP中存在4位首部长度,占的是4个比特位 (采用的是位段,所以有比特位)
首部长度 有基本单位:4字节
4位首部长度 表示 TCP报头一共有多少4字节对应的行
二进制的取值范围为[0000,1111],转化为 十进制的取值范围为[0,15]
取值范围乘以4后,变为 [0,60]
由于标准报头长度20字节,所以最终 选项的取值范围是[20,60]
即 选项可从20字节开始,最多到60字节
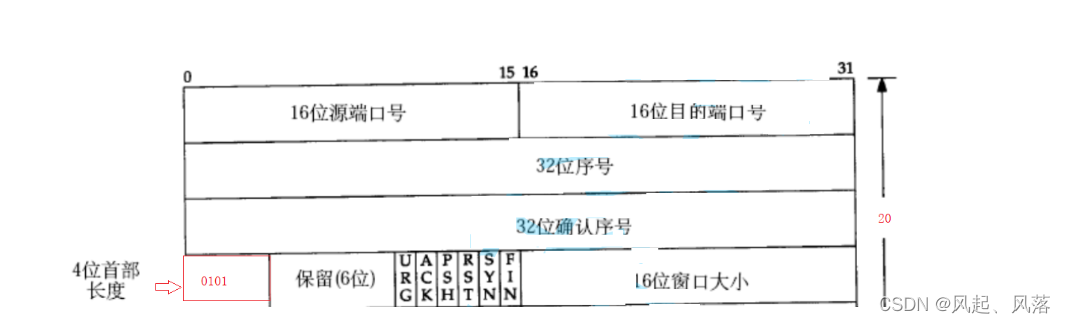
若为标准报头,4为首部长度应该填充多少?
假设填充x
x*4=20 x=5 转化为 二进制是 0101
提取报文的前20个字节(前20个字节一定是标准报头)
在提取首部长度字段
根据首部长度字段* 4 减去20字节
若为0,说明没有选项,报文就是标准报头,直接读取有效载荷即可
若不为0,剩下几个字节,就说明有几个字节的选项,整个报文长度 减去 标准报头以及 选项长度
即可获得 有效载荷
TCP可靠性
确认应答机制的提出
TCP通信时,那些是不可靠的?
丢包、乱序、重复、校验失败、发送太快/太慢
单纯的就是因为 通信双方 距离太远
在这些不可靠的问题中,最核心的就是丢包问题
如何知道丢包了?
就需要正确理解 确认应答机制
确认应答机制的本质:确认是否丢包
如:给你发个报文,需要对该报文进行确认,只要收到了确认,就认为 发的报文被收到了
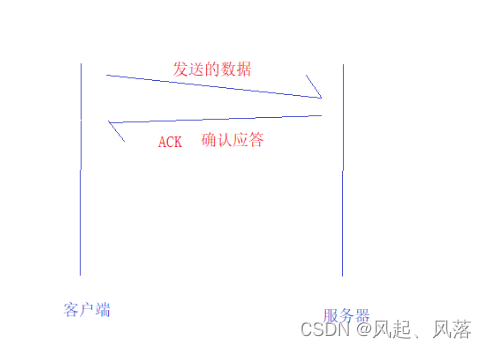
客户端给服务器发了一条消息,可服务器是否收到报文,客户端是不清楚的
客户端为了保证 消息被服务器收到了,就要求 服务器对客户端做应答
虽然无法保证此时的ACK 是否丢失的问题,但是可以保证
只要客户端收到了应答,客户端向服务器发送的数据,对方一定能收到
若客户端收不到应答, 客户端就认为报文丢失
结论:可靠性是通过收到应答保证的
在TCP中 客户端和服务器端,双方的地位是对等的
如:客户端想给服务器端发消息,服务器端必须应答 ,才能保证客户端给服务器发的消息的可靠性
序号和确认序号
如果发一个接收一个,效率太低了,所以就采用一次向对方塞满大量数据
这样的话,服务器的每一个报文都要应答
这样来看效率是提高了,但是会出现两个问题
1. 发送的顺序,不一定是接收的顺序
2. 当服务器收到多个确认的时候, 并不知道哪一个应答,对应哪一个请求报文
为了解决这两个问题, 就需要给报文 带上编号
结论:
TCP报头中必定要包含 序号
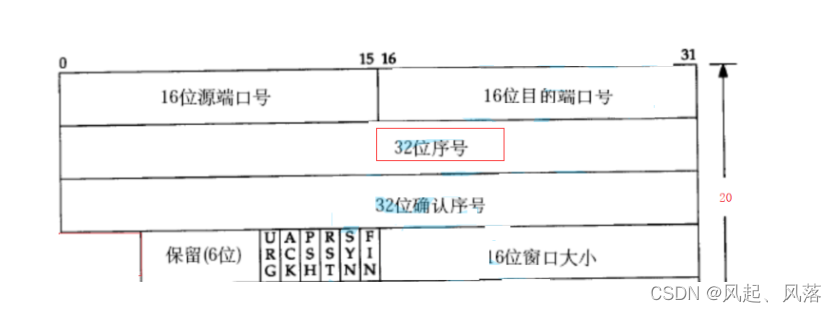
客户端要对众多要发送的报文数据 进行编号
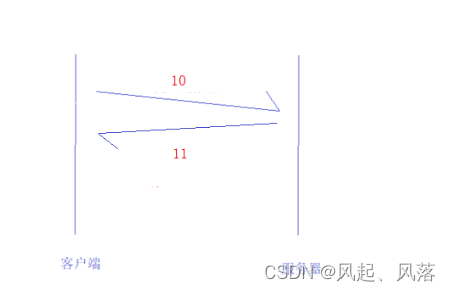
假设 客户端 给服务器发送一个序号为10的报文 ,服务器给客户端的确认应答中 要有 确认序号
此时的确认序号 为 11
确认序号的含义
确认序号X:X-1之前的报文,已经全部收到了,下次发送请从X编号开始发送
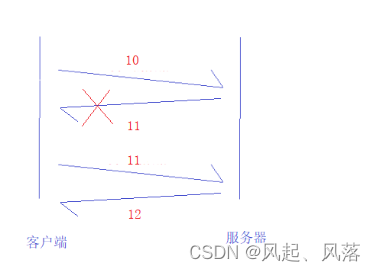
若在确认应答时,序号10对应的确认序号11丢失了
而确认序号12是应答成功的
确认序号12 表示 11号之前的报文已经全部收到了,下次从12序号 开始发送
就可以告诉 客户端 10序号的数据发送成功了,只是应答丢了
为什么序号和确认序号在不同的字段?
TCP是全双工的,既能读,又能写
看似服务器只做了一个确认应答,实际上 服务器做了两个工作
1.给客户端做出应答,2.给客户端发送数据
被压缩成了一个请求/应答,被称为 捎带应答(提高通信效率)
如:有人问你吃了吗? 你说吃了,并反问你呢?
两个人各自只张了一次口,通信效率就提高了
确认应答并不纯粹,在相当大的情况下
确认应答即是对客户端的确认,又携带了服务器给客户端发送的数据
该报文必须要有32位序号,表示 服务器给客户端发送数据时 数据序号的问题
必须要有32位确认序号,服务器对客户端的历史数据的确认
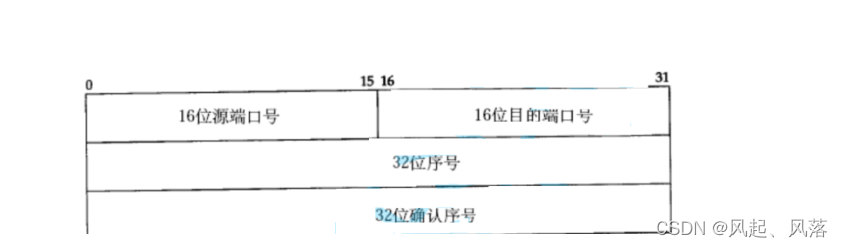
为了32位序号和32位确认序号同时存在,所以必须要在不同的字段
16位窗口大小
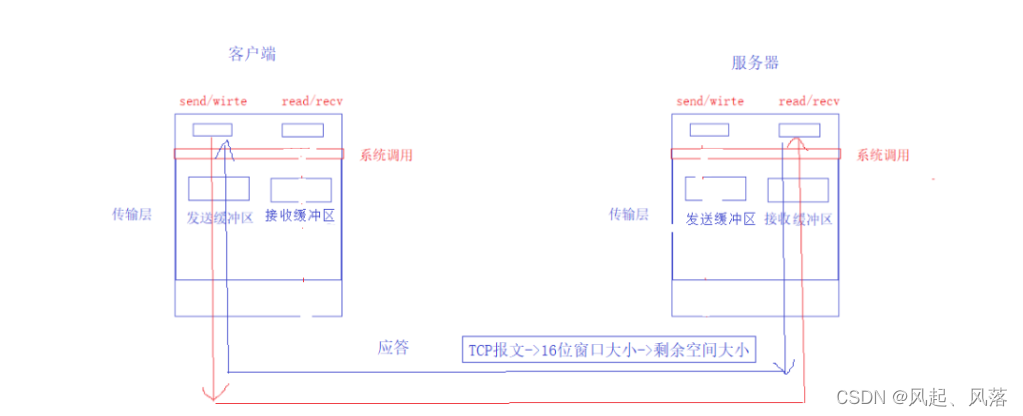
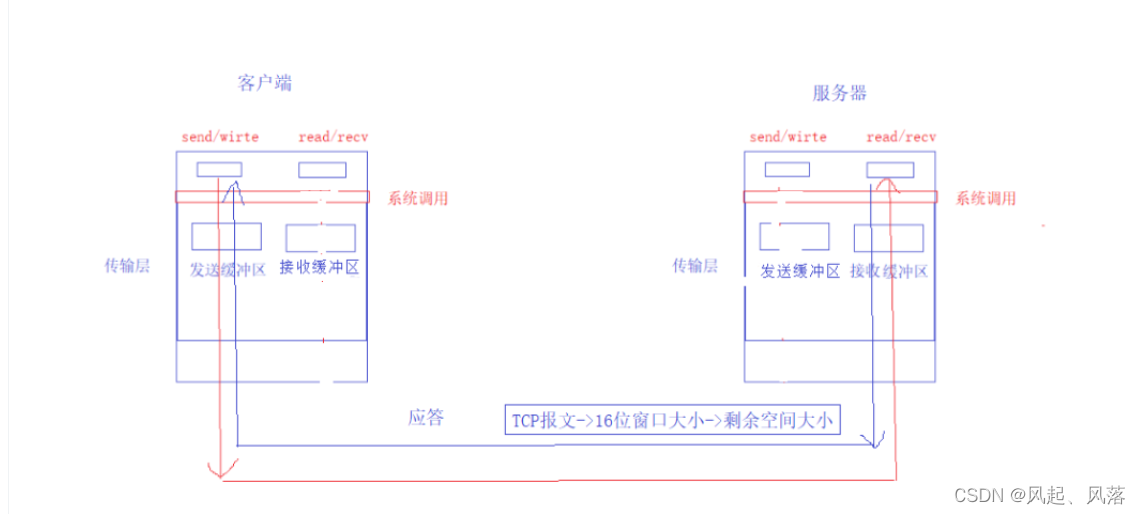
传输层的TCP中包括 发送缓冲区 和 接收缓冲区
在传输层与应用层之间有一个 系统接口
如:send/ write read/recv
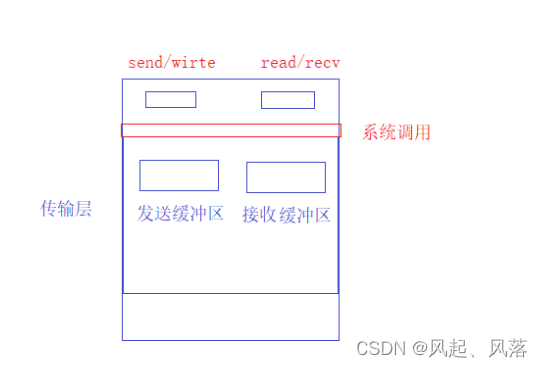
调用系统接口之前,应用层有自己的应用层缓冲区
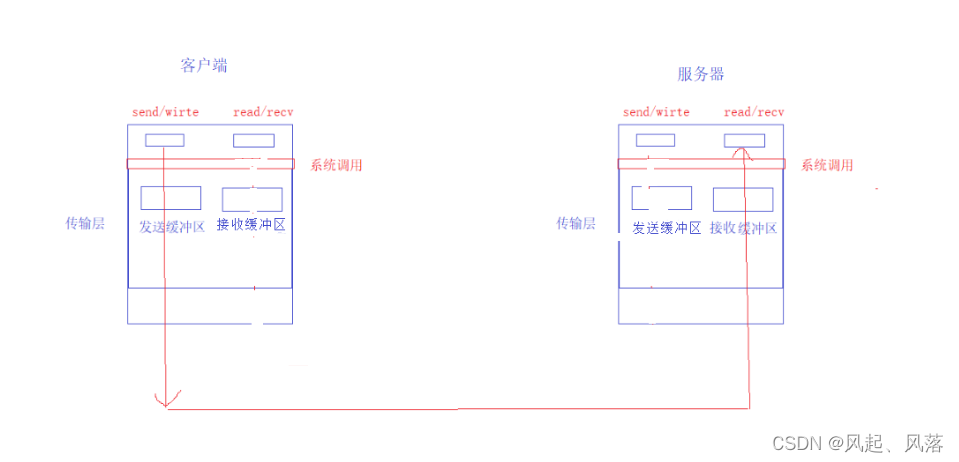
如果TCP发送数据时,发送太快, 接收缓冲区很快就满了,报文就会被丢弃掉
虽然说TCP有重传机制,技术上没有问题,但是这样做不合理
因为 这些报文 经过 各种网络资源的转发,已经消耗很多的网络资源了,才到达了目标主机
为了不出现当前情况,让发送方 控制 一下自己的发送速度,这种策略 称之为 流量策略
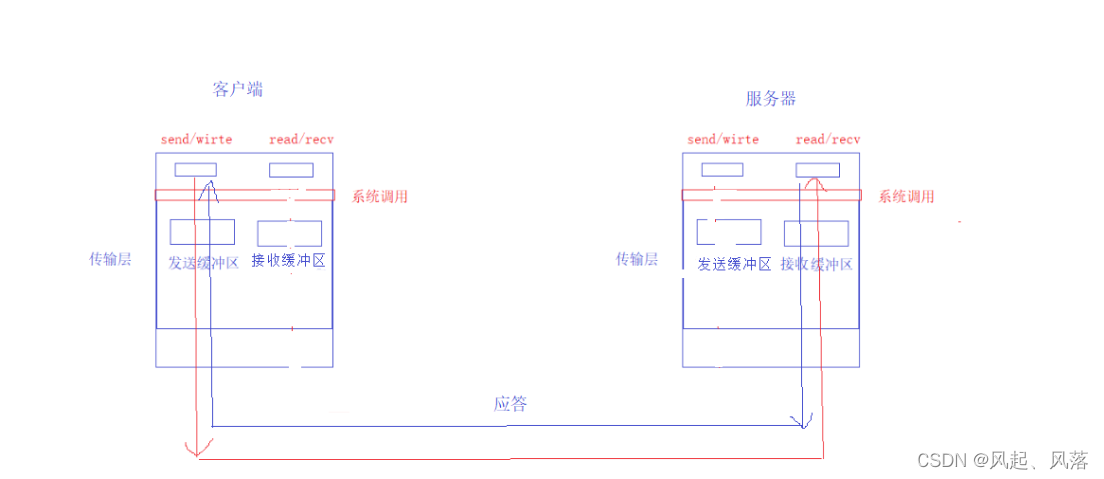
接受方 在收到报文时,对每一个 收到的报文 都会进行应答
为了不使 接收方 来不及接收,所以需要将自己的接收能力 告诉对方
如:你回家 你妈给你做了一桌子菜,当你吃饭时,你妈一直给你加菜,直到你吃不动时,就跟你妈说,吃饱了,但如果你妈依旧给你加菜,你肯定受不了
发送方发送的策略,是要受接收方接收的能力 影响的
而接收方的接收能力 取决于 接收缓冲区的剩余空间的大小
每个报文都有应答 以及 自己是知道自己的接收能力的 ,两者合在一起 ,就对应 TCP的16位窗口大小
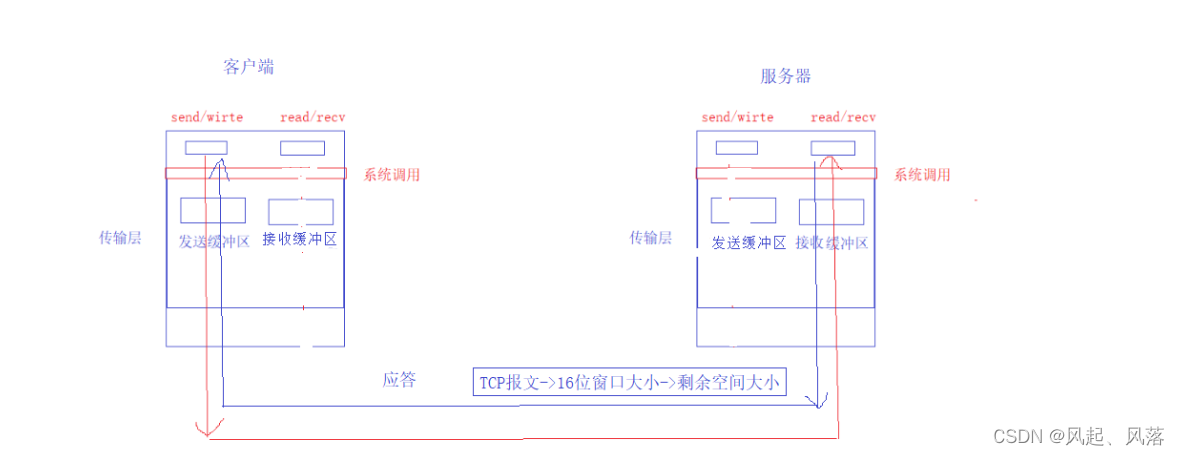
客户端给服务器发送消息时,服务器要给客户端做出响应,响应中携带对应的TCP报文,TCP报文中包含TCP报头
报头中包含 16位窗口大小, 会把服务器中 接收缓冲区的剩余空间大小 填入窗口大小中
就根据 16位窗口大小 来决定发送方 还能发送多少数据
6个标志位
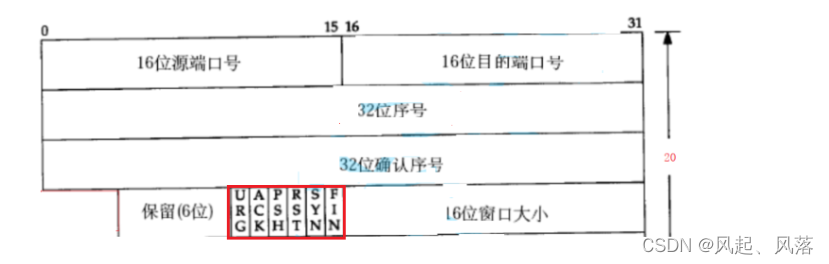
每一个标志位在报头中 只占一个比特位
标志位本质

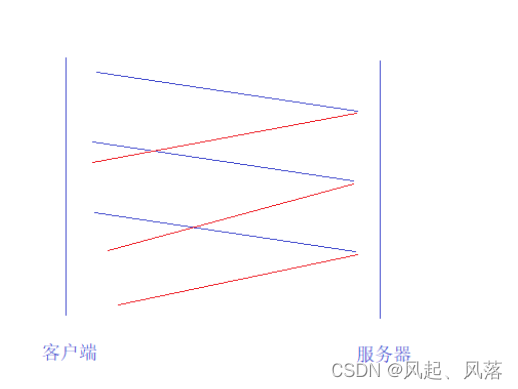
可能存在很多的客户端给服务器 发消息
所有的客户端在任何时刻 都可能发送大量消息
TCP是面向链接的,服务器在收到数据时,这些收到的数据 有相当一部分是链接请求
当通信完成时,可能会断开链接,此时客户端要给服务器发送一些断开链接的请求
在建立链接之后,断开链接之前,客户端要给服务器 正常的数据通信
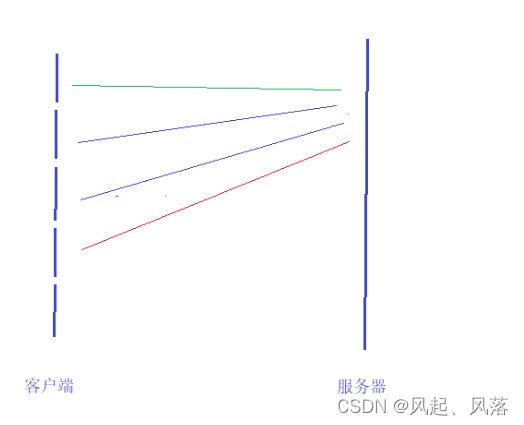
绿色建立链接 蓝色发送消息 红色断开链接
服务器在同一时刻 会收到各种各样的报文请求,报文之间是不同的
如:你是一家餐厅的老板,在餐厅中有各种各样的人,有的人是来吃饭的,有的人是来找人的,有的人是来拿外卖的
你每天都会面对各种各样不同的人,这些各种各样不同的人是你观察到的现象
来吃饭的,会进行推荐店里最好吃的东西
来找人的,就会询问是什么样子的
不同的人 来到店里 提供不同的处理动作
你把人划分成不同的类型,所以 报文也是有类型的
标志位的本质就是 标识不同类型的报文,所以服务器就会有不同的处理动作
具体标志位
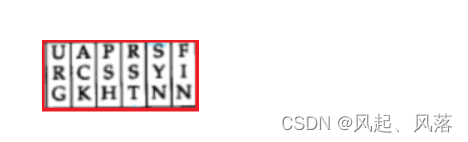
ACK:该报文 是一个确认应答报文,可能会携带数据 (捎带应答)
SYN:是一个连接请求的报文 (三次握手)
FIN: 是一个连接断开的请求报文 (四次挥手)
这三个后面会详细说
PSH
催促对方,让对方尽快将接收缓冲区的数据 向上交付
如:当你正在写作业,你的爸爸过来催促你,让你赶紧做
所以每一个人在完成一件事情时,在一定的情况下,别人会催促你,让你尽快把一件事情做成
同理,客户端给服务器发送消息时, 服务器要给客户端做出应答,
通告客户端 ,服务器中的接收缓冲区的剩余空间的大小,使客户端进行 流量控制
若服务器的TCP报文 在的 窗口大小为0, 则客户端就不能发送数据了
所以客户端就需要 定期给服务器 发送一些询问报文(不携带数据)
客户端就会确认应答,同时也会告知对应的 窗口大小依旧为0
客户端再次发起询问报文,就可以将自己对应的PSH置为1
表示让服务器中的应用层赶紧把接收缓冲区的内容取走,把接收缓冲区的空间腾出来,以方便客户端发送数据
RST
TCP三次握手时,需要进行三次报文交互,不一定能握手成功
但握手成功了,一定是经历了三次握手
当客户端 与服务器 进行链接时,双方都认为有链接,服务器端因为一些原因 而释放了对应的链接
而客户端还不知道,客户端还会一直维护这个链接
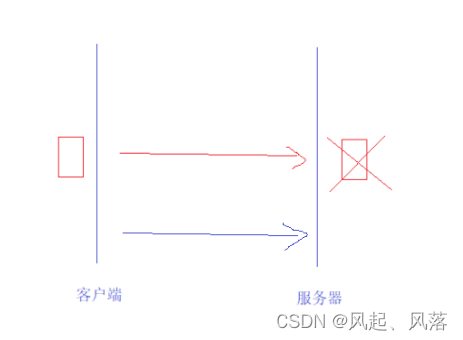
过了一会,服务器又把对应的网线插上了,客户端又向服务器发起请求
服务器并没有接收到 获取到三次握手的任何细节,所以服务器意识到客户端的链接是异常的
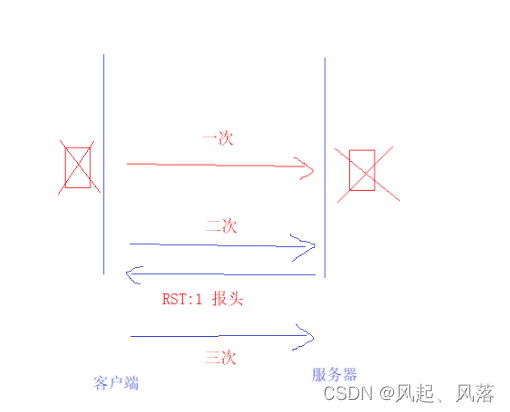
所以服务器就会给客户端发送 一个 RST置为1的TCP报头
当客户端接收到 当前报头时,将自己老的链接释放掉,再重新发起三次握手
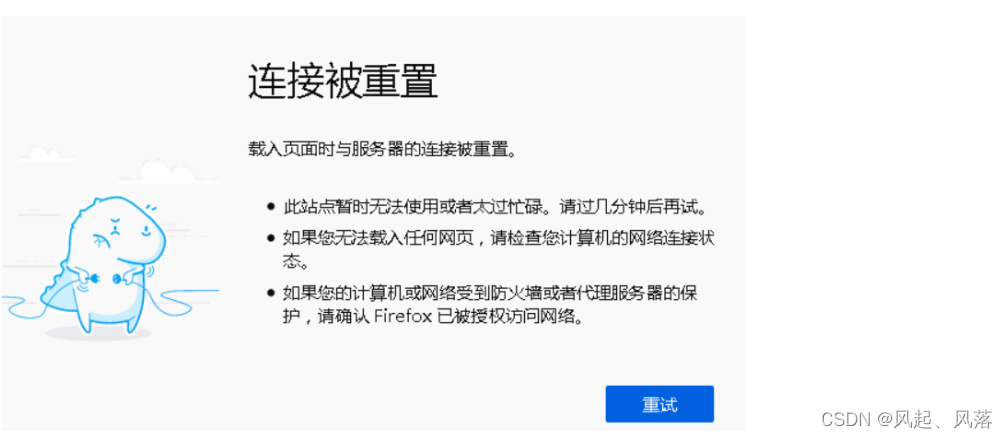
RST 全称 为 reset,作用为 对链接进行重置
URG
紧急指针标志位
TCP本身包含了序号,就可以将TCP报文按序号排序,就可以按序号由小到大入队列,这样就保证上层拿到的数据是有序的
若报文中携带了特殊数据,让接收方将特殊数据插队处理,就需要使用URG标志位
作用为:告诉接收方, 当前报文中的有效载荷里面 有紧急数据存在的,并且16位紧急指针是有效的
(大部分情况下 16位紧急指针是无效的)
若URG被置1,则表示报文中包含了紧急数据
16位紧急指针 本质为 一个偏移量,紧急数据(只有1个字节) 在有效载荷中的偏移量
超时重传机制
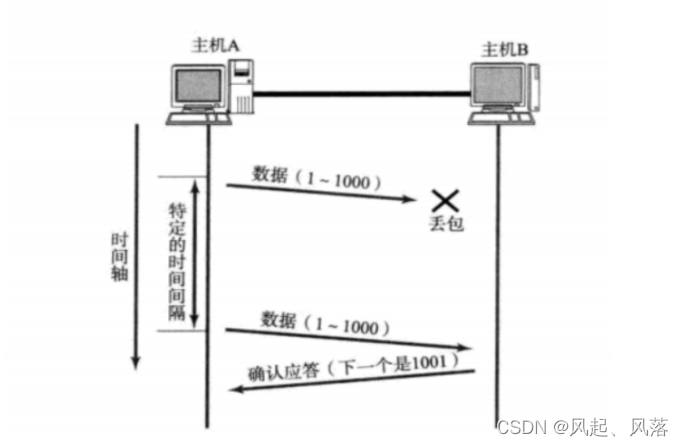
若主机A向主机B发送消息,是有可能造成丢包的,但如何知道丢包呢?
在特定的时间范围有没有收到应答,若收到应答,则说明收到了
若没收到应答,则说明报文在网络中丢失了
主机A收不到应答的情况 分为两种
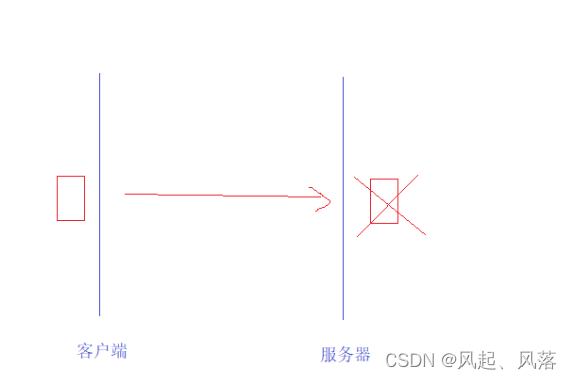
第一种:
虽然主机A给主机B发送数据,但主机B没有接收到数据,所以主机B就不会应答
所以主机A在等待一段时间后,就会把对应的数据重发一次
这个重发的过程就叫做 超时重传

TCP发送数据时,必须把暂时没有得到反馈的数据 维护一段时间,支持超时重传
最理想的情况下,找到一个最小的时间, 保证 确认应答一定再这个时间内返回
若超时时间设置太长,会影响整体的重传效率
若超时时间设置太短,有可能会频繁发送重复的包
第二种:

主机A给主机B发送数据时,主机B接收到了数据,但是应答丢失了
主机A在特定时间内若没有收到对应的应答,主机A会重新再发送对应的数据
主机B有可能收到 重复报文
就需要主机B进行对应报文的去重