破解版网站建设php如何做局域网的网站建设
《SPSS统计学基础与实证研究应用精解》张甜 杨维忠 清华大学出版社 2023年 一书中有详细讲解。回归分析(regression analysis)是确定两种或两种以上变量间相互依赖的定量关系的一种统计分析方法。按照涉及的变量的多少,分为一元回归和多元回归分析;按照因变量的多少,可分为简单回归分析和多重回归分析;按照自变量和因变量之间的关系类型,可分为线性回归分析和非线性回归分析。
一、案例介绍
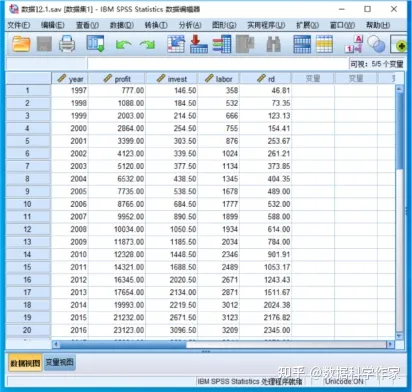
本节用于分析的数据是数据12.1,记录的是XX生产制造企业1997-2021年营业利润水平(profit)、固定资产投资(invest)、平均职工人数(labor)、研究开发支出(rd)等数据。
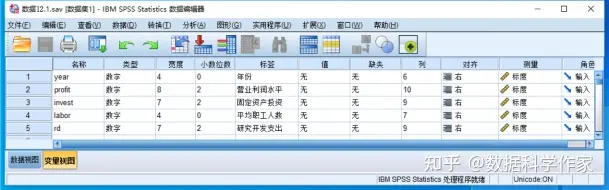
数据12.1的数据视图与变量视图分别如下图所示。
二、SPSS操作
下面我们以营业利润水平作为因变量,以固定资产投资、平均职工人数、研究开发支出作为自变量,开展线性回归分析,SPSS操作如下:
打开数据12.1,选择“分析”→“回归”→“线性”命令,弹出如下图所示的“线性回归”对话框。在该对话框左侧的列表框中选中“营业利润水平[profit]”并单击按钮,使之进入“因变量”列表框,选中“固定资产投资[invest]”“平均职工人数[labor]”“研究开发支出[rd]”并单击按钮,使之进入“自变量”列表框。在“方法”下拉列表中,指定自变量进入分析的方式,本例中保持系统默认的“输入”方式。

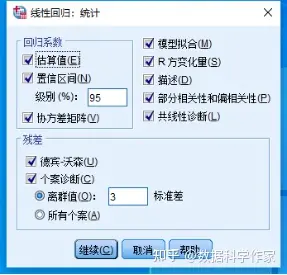
单击“统计”按钮,弹出“线性回归:统计”对话框,如图12.4所示。“线性回归:统计”对话框包括“回归系数”和“残差”两个选项组,以及“模型拟合”“R方变化量”“描述”“部分相关性和偏相关性”“共线性诊断”复选框。在本例中,为了讲解比较充分,我们选择上述全部选项组及选项。
三、结果解读
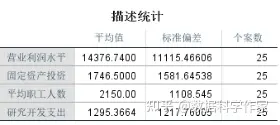
下图给出了描述统计结果,显示了因变量及各个自变量全部样本观测值的平均值、标准偏差和个案数,比如营业利润水平全部样本观测值的平均值是14376.7400,标准偏差是11115.46606,个案数是25个。
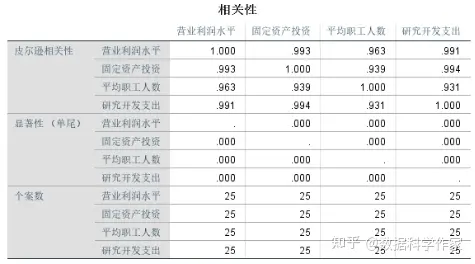
下图给出了相关系数矩阵,显示了因变量及各个自变量两两间的皮尔逊相关系数,以及关于相关系数等于零假设的单尾显著性P值,可以发现因变量及各个自变量两两间的皮尔逊相关系数非常高,而且全部呈正相关关系。
下图给出了模型摘要,模型的复相关系数(R)为0.998,可决系数(R方)为0.996,修正的可决系数(调整后R方)为0.995,说明模型的解释能力非常好。另外,图中还给出了其他统计量,其中德宾-沃森检验值DW=0.875。DW是一个用于检验一阶变量自回归形式的序列相关问题的统计量,DW在数值2附近说明模型变量无序列相关,越趋近于0说明正自相关性越强,越趋近于4说明负自相关性越强。本例中说明模型变量可能有一定的正自相关。

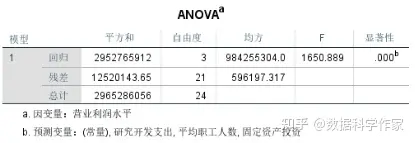
下图给出了ANOVA分析,从中可以看到模型设定检验F统计量的值为1650.889,显著性水平几乎为零,于是我们的模型通过了设定检验,也就是说,因变量与自变量之间的线性关系明显。
下图为回归系数结果,包括未标准化系数及其标准错误、标准化系数、t值、显著性P值、未标准化系数95%的置信区间等统计量,结合未标准化系数结果,最终线性回归方程的表达式为:
营业利润水平=2.859*固定资产投资+2.627*平均职工人数+3.127*研究开发支出-315.637

如果是基于通用的0.05的显著性水平,可以发现各个自变量系数包括固定资产投资(P=0.006)、平均职工人数(P=0.000)、研究开发支出(P=0.013)等都是比较显著的,而且都是正向作用关系(系数值均大于0)。
针对回归系数结果,后面的“共线性统计”解释如下:
容差和VIF(方差膨胀因子)都是衡量回归模型多重共线性的指标。一般情况下,如果容差< 0.2或VIF > 10,则说明自变量之间存在多重共线性的问题。本例中,固定资产投资和研究开发支出两个变量的容差分别为0.011、0.013,均显著小于0.2,VIF分别为88.919、79.134,均显著大于10,说明自变量之间的多重共线性还是比较明显的。
上述内容节选自《SPSS统计学基础与实证研究应用精解》张甜 杨维忠 清华大学出版社 2023年。
四、学习材料推荐
SPSS入门方面,建议一定边看书边操作,通过边学知识边上手操作的方式学习,会事半功倍,也有解决问题的成就感。光看视频的效果是很难保证的。推荐三本避雷避坑、亲测可行的网红图书,也是杨维忠、张甜老师撰写的SPSS三部曲,这三本书都有配套赠送的视频讲解,还有全部随书数据文件都是赠送的。
1、《SPSS统计分析入门与应用精解(视频教学版)》杨维忠 张甜 清华大学出版社 2022年。侧重SPSS统计分析操作,体现在对于窗口选项设置和运行结果解读都非常全面、细致、到位;
2、《SPSS统计学基础与实证研究应用精解》张甜 杨维忠 清华大学出版社 2023年。为使用SPSS写作实证研究类论文所精心设计,实现零基础入门学会用SPSS写论文的目的。
3、《SPSS统计分析商用建模与综合案例精解》杨维忠 张甜 清华大学出版社 2021年。侧重使用SPSS开展数据挖掘、机器学习以及统计分析的综合应用。
《SPSS统计分析入门与应用精解(视频教学版)》杨维忠 张甜 编著 清华大学出版社。这是一本精解SPSS统计分析基础入门与应用的教材,山东大学陈强教授作序推荐,通过“精解统计分析原理、精解SPSS窗口选项设置、精解SPSS输出结果”三要素,帮助读者真正掌握常用统计分析软件SPSS的应用。适用于经济金融、管理、市场营销、教育学、心理学、医学等各类专业。
全书共14章。第1章为SPSS基础与应用操作概述;第2~7章介绍SPSS的基本统计分析方法,包括描述统计分析方法、比较平均值分析方法、非参数检验方法、相关分析方法、一般线性模型、各类常用回归分析方法等;第8~13章介绍SPSS的常用高级统计分析方法,包括时间序列预测方法、聚类分析方法、决策树分析与判别分析方法、生存分析方法、降维分析方法等;第14章为如何使用SPSS进行高质量综合性研究。每章有教学重点提示,章后有“知识点总结与练习题”,帮助读者增强学习效果,形成了“从基础原理到操作精解,从数据分析到案例应用”的完整教学闭环。与本书配套的还有教学PPT和作者新讲解的全套视频资料以辅助教学,力求实现最佳教学效果。
本书可作为经济学、管理学、统计学、金融学、社会学、医学、电子商务等相关专业的在校本、专科大学生及研究生学习、应用SPSS的主要教材,还可作为职场人士掌握SPSS应用、提升数据分析能力,进而提升工作效率、改善绩效水平的工具书。

如果是写论文使用SPSS,则推荐《SPSS统计学基础与实证研究应用精解》张甜 杨维忠著 清华大学出版社
《SPSS统计学基础与实证研究应用精解》张甜 杨维忠著 清华大学出版社
本书手把手教会使用SPSS撰写实证研究类论文或开展数据分析
常用统计学原理、实证研究的套路、调查问卷设计、信度分析、效度分析、T检验、ANOVA分析、相关性分析、回归分析、中介效应、调节效应、因子分析、聚类分析……一应俱全。

如果是使用SPSS开展数据挖掘、机器学习以及统计分析的综合应用,推荐《SPSS统计分析商用建模与综合案例精解》杨维忠 张甜编著 清华大学出版社 2021年 。国内众多高校作为核心专业课程教材。在51CTO举办的“2021年度最受读者喜爱的IT图书作者评选”中,《SPSS统计分析商用建模与综合案例精解》荣获“数据科学领域最受读者喜爱的图书TOP5”。

京东、当当、淘宝各大平台均在热销中,搜索书名即可。
创作不易,恳请大家多多点赞支持!也欢迎大家关注我,让我们一起学习Stata、SPSS、Python知识。多谢!