建网站的专业公司网页设计作品源代码彼岸花坊

星光下的赶路人star的个人主页
夏天就是吹拂着不可预期的风
文章目录
- 1、模板引擎
- 1.1 Thymeleaf
- 1.2 基础语法
- 1.3 属性设置
- 1.4 遍历
- 1.5 判断
- 1.6 属性优先级
- 1.7 行内写法
- 1.8 变量选择
- 1.9 模板布局
- 1.10 devtools
- 2、国家化
- 3、错误处理
- 3.1 默认机制
- 3.2 自定义错误响应
- 3.3 最佳实战
1、模板引擎
- 由于SpringBoot使用了嵌入式Servlet容器。所以JSP默认是不能使用的。
- 如果需要服务端页面渲染,优先考虑使用模板引擎。
模板引擎页面默认放在src/main/resources/templates
SpringBoot包含以下模板引擎的自动配置
- FreeMarker
- Groovy
- Thymeleaf
- Mustache
Thymeleaf官网:https://www.thymeleaf.org/
<!DOCTYPE html>
<html xmlns:th="http://www.thymeleaf.org">
<head><title>Good Thymes Virtual Grocery</title><meta http-equiv="Content-Type" content="text/html; charset=UTF-8" /><link rel="stylesheet" type="text/css" media="all" th:href="@{/css/gtvg.css}" />
</head>
<body><p th:text="#{home.welcome}">Welcome to our grocery store!</p>
</body
</html>
1.1 Thymeleaf
导入依赖
<dependency><groupId>org.springframework.boot</groupId><artifactId>spring-boot-starter-thymeleaf</artifactId>
</dependency>
自动配置原理
1、开启了org.springframework.boot.autoconfigure.thymeleaf.ThymeleafAutoConfiguration 自动配置。
2、属性绑定在ThymeleafProperties中,对应配置文件spring.thymeleaf内容
3、所以的模板页面默认在classpath:/templates文件夹下
4、默认效果
-
- a、所有的模板页面在/classpath:/templates/下面找
-
- b、找后缀名为.html的页面
1.2 基础语法
1、核心用法
th:xxx:动态渲染指定的html标签属性值、或者th指令(遍历、判断等)
- th:text:标签体内文本值渲染
-
- thutext:不会转义,显示为html原本的样子
- th:属性:标签指定属性渲染
- th:attr:标签任意属性渲染
- th:if、th:each、…:其他th指令
- 例如
<p th:text="${content}">原内容</p>
<a th:href="${url}">登录</a>
<img src="../../images/gtvglogo.png" th:attr="src=@{/images/gtvglogo.png},title=#{logo},alt=#{logo}" />
表达式:用来动态取值
- ${}:变量取值:使用model共享给页面的值都直接用${}
- @{}:url路径
- #{}:国际化消息
- ~{}:片段引用
- *{}:变量选择:需要配置th:object不到对象
系统工具&内置对象:详细文档
● param:请求参数对象
● session:session对象
● application:application对象
● #execInfo:模板执行信息
● #messages:国际化消息
● #uris:uri/url工具
● #conversions:类型转换工具
● #dates:日期工具,是java.util.Date对象的工具类
● #calendars:类似#dates,只不过是java.util.Calendar对象的工具类
● #temporals: JDK8+ java.time API 工具类
● #numbers:数字操作工具
● #strings:字符串操作
● #objects:对象操作
● #bools:bool操作
● #arrays:array工具
● #lists:list工具
● #sets:set工具
● #maps:map工具
● #aggregates:集合聚合工具(sum、avg)
● #ids:id生成工具
2、语法示例
表达式:
- 变量取值:${…}
- url取值:@{…}
- 国际化消息:#{…}
- 变量选择:*{…}
- 片段引用:~{…}
常见:
- 文本:‘one text’,‘another one’…
- 数字:0,34,…
- 布尔:true,false
- null:null
- 变量名:one,sometext,main,…
文本操作:
- 拼串:+
- 文本替换:|The name is ${name}|
布尔操作
- 二进制运算:and,or
- 取反:!,not
比较运算
- 比较:>,<,<=,>=(gt,lt,ge,le)
- 等值运算:=,!=
条件运算
- if-then :(if)?(then)
- if-then-else:(if)?(then):(else)
特殊操作
- 无操作
所有以上都可以嵌套组合
'User is of type ' + (${user.isAdmin()} ? 'Administrator' : (${user.type} ?: 'Unknown'))
1.3 属性设置
- th:href=“@{/product/list}”
- th:attr=“class=${active}”
- th:attr=“src=@{/images/gtvglogo.png},title=${logo},alt=#{logo}”
- th:checked=“${user.active}”
<p th:text="${content}">原内容</p>
<a th:href="${url}">登录</a>
<img src="../../images/gtvglogo.png" th:attr="src=@{/images/gtvglogo.png},title=#{logo},alt=#{logo}" />
1.4 遍历
语法:th:each=“元素名,迭代状态:${集合}”
<tr th:each="prod : ${prods}"><td th:text="${prod.name}">Onions</td><td th:text="${prod.price}">2.41</td><td th:text="${prod.inStock}? #{true} : #{false}">yes</td>
</tr><tr th:each="prod,iterStat : ${prods}" th:class="${iterStat.odd}? 'odd'"><td th:text="${prod.name}">Onions</td><td th:text="${prod.price}">2.41</td><td th:text="${prod.inStock}? #{true} : #{false}">yes</td>
</tr>
iterStat有以下属性:
● ndex:当前遍历元素的索引,从0开始
● count:当前遍历元素的索引,从1开始
● size:需要遍历元素的总数量
● current:当前正在遍历的元素对象
● even/odd:是否偶数/奇数行
● first:是否第一个元素
● last:是否最后一个元素
1.5 判断
th:if
<ahref="comments.html"th:href="@{/product/comments(prodId=${prod.id})}"th:if="${not #lists.isEmpty(prod.comments)}">view</a
th:switch
<div th:switch="${user.role}"><p th:case="'admin'">User is an administrator</p><p th:case="#{roles.manager}">User is a manager</p><p th:case="*">User is some other thing</p>
</div>
1.6 属性优先级
- 判断
- 遍历
- 判断
<ul><li th:each="item : ${items}" th:text="${item.description}">Item description here...</li>
</ul>
Order Feature Attributes
1 片段包含 th:insert th:replace
2 遍历 th:each
3 判断 th:if th:unless th:switch th:case
4 定义本地变量 th:object th:with
5 通用方式属性修改 th:attr th:attrprepend th:attrappend
6 指定属性修改 th:value th:href th:src …
7 文本值 th:text th:utext
8 片段指定 th:fragment
9 片段移除 th:remove
1.7 行内写法
[[…]] or [(…)]
<p>Hello, [[${session.user.name}]]!</p>
1.8 变量选择
<div th:object="${session.user}"><p>Name: <span th:text="*{firstName}">Sebastian</span>.</p><p>Surname: <span th:text="*{lastName}">Pepper</span>.</p><p>Nationality: <span th:text="*{nationality}">Saturn</span>.</p>
</div>
等同于
<div><p>Name: <span th:text="${session.user.firstName}">Sebastian</span>.</p><p>Surname: <span th:text="${session.user.lastName}">Pepper</span>.</p><p>Nationality: <span th:text="${session.user.nationality}">Saturn</span>.</p>
</div
1.9 模板布局
- 定义模板:th:fragment
- 引用模板:~{templatename::selector}
- 插入模板:th:insert、th:replace
<footer th:fragment="copy">© 2011 The Good Thymes Virtual Grocery</footer><body><div th:insert="~{footer :: copy}"></div><div th:replace="~{footer :: copy}"></div>
</body>
<body>结果:<body><div><footer>© 2011 The Good Thymes Virtual Grocery</footer></div><footer>© 2011 The Good Thymes Virtual Grocery</footer></body>
</body>
1.10 devtools
<dependency><groupId>org.springframework.boot</groupId><artifactId>spring-boot-devtools</artifactId></dependency>
修改页面后;ctrl+F9刷新效果;
java代码的修改,如果devtools热启动了,可能会引起一些bug,难以排查
2、国家化
国际化的自动配置参照MessageSourceAutoConfiguration
实现步骤:
1、Spring Boot在类路径根下查找messages资源绑定文件。文件名为:message.properties.
2、多语言可以定义多个消息文件,命名为message_区域代码.properties。如:
- messages.properties:默认
- messages_zh_CN.properties:中文环境
- messages_en_US.properties:英文环境
3、在程序中自动注入MessageSource组件,获取国际化的配置项值
4、在页面中可以使用表达式#{}获取国际化的配置项值
@Autowired //国际化取消息用的组件MessageSource messageSource;@GetMapping("/haha")public String haha(HttpServletRequest request){Locale locale = request.getLocale();//利用代码的方式获取国际化配置文件中指定的配置项的值String login = messageSource.getMessage("login", null, locale);return login;}3、错误处理
3.1 默认机制
错误处理的自动配置都在ErrorMvcAutoConfiguration中,两大核心机制:
- SpringBoot会自适应处理错误,响应页面或JSON数据
- SpringMVC的错位处理机制依然保留,MVC处理不了,才会交给Boot进行处理
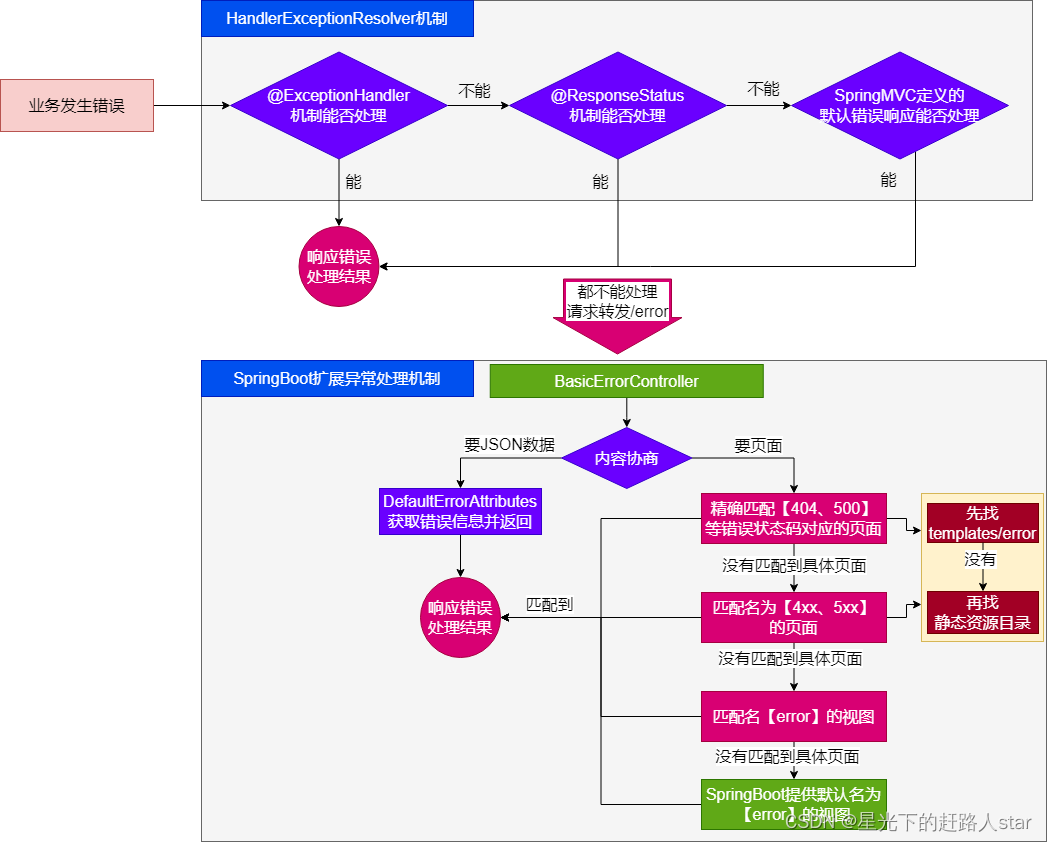
- 发送错误以后,转发给/error路径,SpringBoot在底层写好应该BasicErrorController,专门处理这个请求
@RequestMapping(produces = MediaType.TEXT_HTML_VALUE) //返回HTMLpublic ModelAndView errorHtml(HttpServletRequest request, HttpServletResponse response) {HttpStatus status = getStatus(request);Map<String, Object> model = Collections.unmodifiableMap(getErrorAttributes(request, getErrorAttributeOptions(request, MediaType.TEXT_HTML)));response.setStatus(status.value());ModelAndView modelAndView = resolveErrorView(request, response, status, model);return (modelAndView != null) ? modelAndView : new ModelAndView("error", model);}@RequestMapping //返回 ResponseEntity, JSONpublic ResponseEntity<Map<String, Object>> error(HttpServletRequest request) {HttpStatus status = getStatus(request);if (status == HttpStatus.NO_CONTENT) {return new ResponseEntity<>(status);}Map<String, Object> body = getErrorAttributes(request, getErrorAttributeOptions(request, MediaType.ALL));return new ResponseEntity<>(body, status);}
- 错误页面是这么解析的
//1、解析错误的自定义视图地址
ModelAndView modelAndView = resolveErrorView(request, response, status, model);
//2、如果解析不到错误页面的地址,默认的错误页就是 error
return (modelAndView != null) ? modelAndView : new ModelAndView("error", model);
容器中专门有一个错误视图解析器
@Bean
@ConditionalOnBean(DispatcherServlet.class)
@ConditionalOnMissingBean(ErrorViewResolver.class)
DefaultErrorViewResolver conventionErrorViewResolver() {return new DefaultErrorViewResolver(this.applicationContext, this.resources);
}
SpringBoot解析自定义错误页的默认规则
@Overridepublic ModelAndView resolveErrorView(HttpServletRequest request, HttpStatus status, Map<String, Object> model) {ModelAndView modelAndView = resolve(String.valueOf(status.value()), model);if (modelAndView == null && SERIES_VIEWS.containsKey(status.series())) {modelAndView = resolve(SERIES_VIEWS.get(status.series()), model);}return modelAndView;}private ModelAndView resolve(String viewName, Map<String, Object> model) {String errorViewName = "error/" + viewName;TemplateAvailabilityProvider provider = this.templateAvailabilityProviders.getProvider(errorViewName,this.applicationContext);if (provider != null) {return new ModelAndView(errorViewName, model);}return resolveResource(errorViewName, model);}private ModelAndView resolveResource(String viewName, Map<String, Object> model) {for (String location : this.resources.getStaticLocations()) {try {Resource resource = this.applicationContext.getResource(location);resource = resource.createRelative(viewName + ".html");if (resource.exists()) {return new ModelAndView(new HtmlResourceView(resource), model);}}catch (Exception ex) {}}return null;}
容器中有一个默认的名为error的view;提供了默认白页功能
@Bean(name = "error")
@ConditionalOnMissingBean(name = "error")
public View defaultErrorView() {return this.defaultErrorView;
}
封装了JSON格式的错误信息
@Bean@ConditionalOnMissingBean(value = ErrorAttributes.class, search = SearchStrategy.CURRENT)public DefaultErrorAttributes errorAttributes() {return new DefaultErrorAttributes();}
规则:
1、解析一个错误页
(1)如果发生了500、404、503、403这些错误
- 如果有模板引擎,默认在classpath:/templates/error/精确码.html
- 如果没有模板引擎,在静态资源文件夹下找精确码.html
(2)如果匹配不到精确码.html这些精确的错误页,就去找5xx.html,4xx.html模糊匹配 - 如果有模板引擎,默认在classpath:/template/error/5xx.html
- 如果没有模板引擎,在静态资源目录下找5xx.html
2、如果模板引擎路径templates下有error.html页面,就直接去渲染
3.2 自定义错误响应
1、自定义json响应
使用@ControllerAdvice+@ExceptionHandler进行统一异常处理
2、自定义页面响应
根据boot的错误页面规则,自定义页面模板
3.3 最佳实战
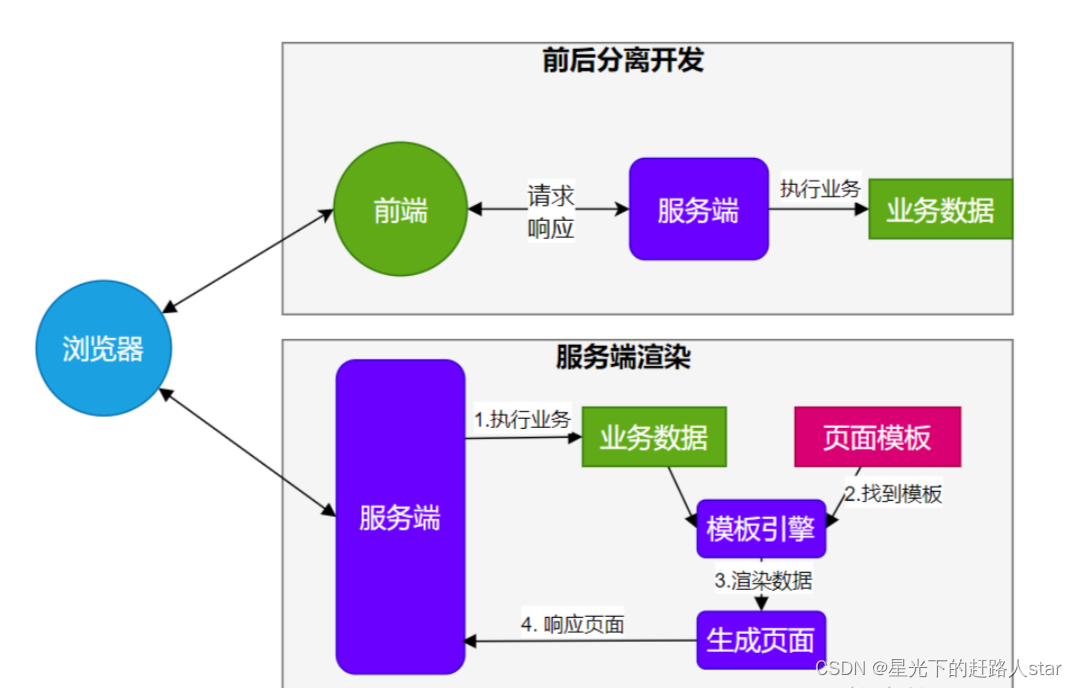
- 前后分离
-
- 后台发生的所有错误,@ControllerAdvice+@Exceptionhandler进行统一异常处理
- 服务端页面渲染
-
- 不可预知的一些,HTTP码表示的服务器或客户端错误
-
-
- 给classpath:/templates/error/下面,放常用精确的错误码页面。500.html,404.html
-
-
- 发生业务错误
-
-
- 核心业务,每一种错误,都应该代码控制,跳转到自己定制的错误页
-
-
-
- 通用业务,classpath:/templates/error.html页面,显示错误信息
-
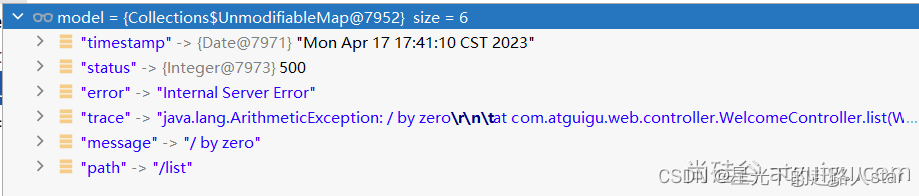
页面,JSON,可用的Model数据如下
![]()
您的支持是我创作的无限动力
![]()
希望我能为您的未来尽绵薄之力
![]()
如有错误,谢谢指正;若有收获,谢谢赞美