专题网站建设策划方案西安免费做网站多少钱
DevOps实践指南
- 25. 附录
- 附录 1 DevOps 的大融合
- 精益运动
- 敏捷运动
- Velocity 大会运动
- 敏捷基础设施运动
- 持续交付运动
- 丰田套路运动
- 精益创业运动
- 精益用户体验运动
- Rugged Computing 运动
- 附录 2 约束理论和核心的长期冲突
- 附录 3 恶性循环列表
- 附录 4 交接和队列的危害
- 附录 5 工业安全误区
- 附录 6 丰田安灯绳
- 附录 7 软件包产品
- 附录 8 事后分析会议
- 附录 9 猿猴军团
- 附录 10 上线时间透明化
- 26. 术语
25. 附录
附录 1 DevOps 的大融合
我们认为 DevOps 正在得益于一场令人难以置信的管理实践大融合,各种实践相互促进和衔接在一起,并形成了一种独特的实践集合,它能对组织的软件开发转型和 IT 产品或服务交付模式的转型产生极大的帮助。
John Willis 称之为“DevOps 的大融合”。下面尽量按时间顺序介绍这次大融合里的各种元素。
请注意,这里并不详细介绍它们,而只是概要地介绍各种思维的演进,以及发生在它们之间的难以置信的链接,最终导致了 DevOps 的应运而生。
精益运动
精益运动始于 20 世纪 80 年代,衍生自丰田生产系统(TPS)。TPS 包括价值流映射、看板和全面生产维护等。
精益的两个主要原则是:
- (1) 坚信前置时间(把原材料转换为成品所需的时间)是提升质量、客户满意度和员工幸福感的最佳预测指标;
- (2) 小批量尺寸是短前置时间的一个最佳预测指标,理论上讲最理想的批量尺寸是“单件流”(即“1×1”的流,库存为 1,批量尺寸为 1)。
精益原则专注于为客户创造价值,要求系统性思考,持之以恒,拥抱科学思维,创建流和拉动(而不是推动)的模式,从源头保证质量,以谦逊为导向,尊重每一个人。
敏捷运动
始于 2001 年。“敏捷宣言”是由 17 位软件开发领域的顶尖大师编写的,目的是掀起一场推广轻量级软件开发方法(如 DP 和 DSDM-动态系统开发方法)的运动,用敏捷替代瀑布式等重量级软件开发过程以及替代统一软件开发过程(RUP)这样的方法论。
它的一个关键原则是:“频繁地交付可工作的软件,交付周期可以是数星期也可以是数月,推荐更短的周期。”另外还有两个原则,一个是小型的、自我激励的团队应工作在高度信任的模式下,一个强调小批量尺寸。敏捷还和一系列的工具和实践相关,如 Scrum、站会等。
Velocity 大会运动
从 2007 年开始,由 Steve Souders、John Allspaw 和 Jesse Robbins 等人组织并发起了 Velocity大会,目的是为 IT 运维和网站性能调优人员提供一个聚首的机会。在 2009 年的 Velocity 会议上,John Allspaw 和 Paul Hammond 做了主题为“每日 10 次部署:Dev 和 Ops 在 Flickr 的协作”的演讲。
敏捷基础设施运动
在 2008 年的多伦多敏捷会议上,Patrick Debois 和 Andrew Schafer 主持了一场名为“羽毛之鸟”专题研讨,探讨如何将敏捷原则应用于基础设施,而不仅限于应用程序代码。他们很快得到了一些志同道合的思考者的响应,其中也包括 John Willis。后来,Patrick 又深受 John 和 Hammond的“每日 10 次部署:Dev 和 Ops 在 Flickr 的协作”演讲的鼓舞,于 2009 年在比利时的根特市,举办了第一次 DevOpsDays 活动,创造了“DevOps”这个词。
持续交付运动
在持续构建、测试和集成等开发实践的基础上,Jez Humble 和 David Farley 发展出了持续交付的理念,其中包括确保将代码和基础设施始终处于可部署状态的“部署流水线”,并且确保所有提交到主干的代码都能安全地部署到生产环境里。
这个想法最早是在 2006 年的敏捷大会上公布于众的,Tim Fitz 在他的一篇名为“持续部署”的博文中完善了这个概念。
丰田套路运动
在 2009 年,Mike Rother 编写了《丰田套路:转变我们对领导力与管理的认知》一书,书中描述了他对丰田 20 年研究的收获。这期间他理解了丰田生产系统(TPS)的因果机制并对其作了综述。书中介绍了“丰田成功背后隐形的管理例程和思维模式及其不断改进和调整……以及其他公司如何在他们的组织中践行类似的例程和思维模式”。
他的结论是,精益社区错失了与所谓的“改善套路”相关的最重要的实践。 他解释说,每个组织都有工作日程,丰田成功的关键因素是改进了工作习惯,并将其植入到组织里每个人的日常工作中。丰田套路建立了一种迭代、增量、科学的解决问题的方法,追求共同的企业目标。
精益创业运动
在 2011 年,Eric Ries 编写了《精益创业:新创企业的成长思维》一书,总结了他在一家硅谷创业公司 IMVU 的经验教训。这本书的核心思想基于 Steve Blank 的《四步创业法》一书和持续部署技术。Eric Ries 还给出了相关实践并定义了一些术语,包括最小化可行产品(MVP)、构建 - 度量 - 学习的循环,以及很多持续部署的技术模式。
精益用户体验运动
在 2013 年,Jeff Gothelf 撰写了《精益设计:设计团队如何改善用户体验》一书,其中描写了如何改进“模糊前端”,并解释了产品经理如何在投入时间和资源以前制定业务假设实验,籍此获取关于业务的信心。有了精益设计,全面优化业务假设、功能开发、测试、部署和为客户发布服务的工具就齐了。
Rugged Computing 运动
2011 年,Joshua Corman、David Rice 和 Jeff Williams 深入考察了软件开发周期晚期进行应用程序和环境安全加固的无效性。 根据考察结果,他们提出了名为 Rugged Computing 的哲学,旨在构建包含稳定性、可扩展性、可用性、生存性、可持续性、安全性、可支持性、可管理性和防御性等的非功能性需求框架。
DevOps 强调高频率发布,可能会给质量保证(QA)和信息安全(Infosec)带来巨大的压力,因为当部署频率从每月或每季度一次提升到每天数百或数千次时,信息安全或质量保证的工作周期就不再是两周一次了。Rugged Computing 运动假设当前的多数信息安全防护措施是没用的。
附录 2 约束理论和核心的长期冲突
约束理论主要讨论核心冲突云(通常称为“C3”)的作用。图 A-1 是 IT 的冲突云示意图。
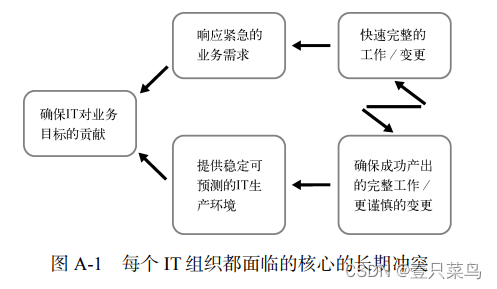
在 20 世纪 80 年代,在制造业里核心的长期冲突非常普遍。所有工厂经理都有两项重要的业务目标:提高销量,降低成本。 问题是,为了保持销量,库存就要增加,以确保始终能满足客户需求。
然而,要降低成本,就应该减少库存,以确保资金没有占用在在制品上。在制品指按客户订单生产的但还不能立即发货的产品。
应用精益原则能解决以上冲突,例如减小批量尺寸,减少在制品数量,以及缩短和放大反馈回路。 这样工厂的生产率、产品质量和客户满意度都会得到显著提高。
DevOps 工作模式背后的原理与制造业变革的原则是相同的,那就是优化 IT 价值流,将业务需求转化成为向客户提供价值的能力和服务。
附录 3 恶性循环列表
《凤凰项目》中描绘的恶性循环如表 A-1 所示。

附录 4 交接和队列的危害
队列等待时间会随着交接次数的增加而延长,因为队列是由于交接而产生的。图 A-2 显示了一个工作中心资源的繁忙程度与等待时间的关系。渐变的曲线显示了为什么“一个 30 分钟的简单变更”通常却需要几周的时间才能完成。某些工程师和项目组若过于繁忙,通常就会变成瓶颈。当一个项目组满负荷时,任何需要它完成的任务都会被淹没在队列里,如果没有人进行催促或提高优先级,该任务将永远也不能完成。
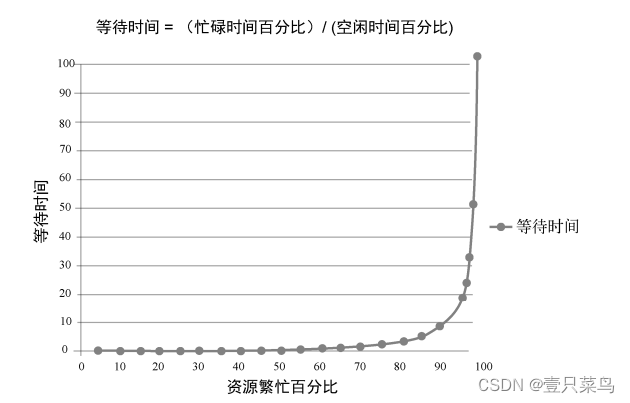
在图 A-2 中,横坐标表示在一个项目组里某特定资源的繁忙百分比,纵坐标是等待时间(或者更准确地说是队列长度)。曲线的形状表明,在资源利用率超过 80%以后,等待时间会急速攀升到顶点。
附录 5 工业安全误区
对复杂系统几十年的研究表明,人们的处理策略都是基于几个误区:
- 误区 1:人为错误是意外和事故最主要且唯一的根源。
- 误区 2:如果人遵守了既定的规程,那么系统就是安全的。
- 误区 3:安全性可以通过设置权限和防护来提升。保护层次越多,安全性就越高。
- 误区 4:事故发生的根本原因(“真相”)可以通过事故分析来确定。
- 误区 5:事故调查就是识别事实和原因之间的逻辑和关联关系。
- 误区 6:安全性总是优先级最高的,不容降低。
误区与真相之间的区别如表 A-2 所示。

附录 6 丰田安灯绳
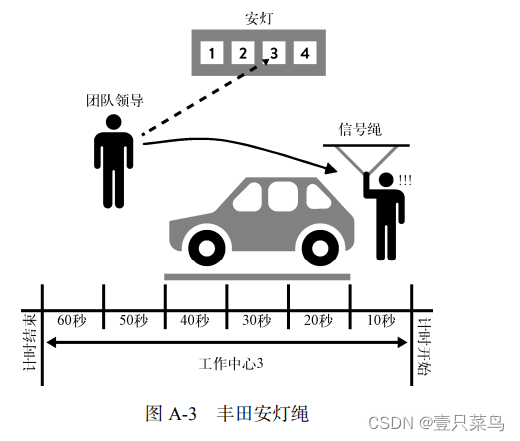
许多人问,如果安灯绳每天被拉了 5000 次,那么生产工作怎么会完成呢?确切地说,并不是每个安灯绳都会导致整个装配线的停止。相反,当安灯拉绳被拉下时,监督那个工作中心的团队领导有 50 秒时间解决这个问题。如果在 50 秒内问题没解决,没有装配完毕的车辆就将越过地板上画的那条线,然后这条装配线才会停止(见图 A-3)。
附录 7 软件包产品
为了将复杂的软件包产品(COTS,commercial off-the-shelf software;如 SAP、IBM WebSphere、Oracle WebLogic)也纳入版本控制,我们可能不得不去掉厂商提供的图形化的点击操作模式的安装工具。为此需要了解厂商提供的工具的用途,还需要一个干净的服务器安装图片,需要比对文件系统,并将新增的文件纳入版本控制。将那些与安装环境无关的文件都放在同一个位置(“基础安装”),将环境有关的文件放入各自的目录(“测试”或者“生产”)。通过这种方式,软件安装操作就变成了版本控制的操作,可视化效果和可重复性都更好了,速度也提升了。
我们可能还要转换应用配置设置,把它们也纳入版本控制。例如,可以将存储在数据库里的应用配置转换为 XML 文件,XML 文件也可以转换为应用配置。
附录 8 事后分析会议
事后分析会议的议程样例如下。
- 首先由会议主持或协调人做会议启动发言,强调这个会议是对事不对人的事后分析会议,我们的重点不是发生过的事,也不会去推测“本来会怎样”或“本来有可能怎样”。协调人可以宣读来自 Retrospective.com 网站的“回顾基本指导原则”。此外,协调人将提醒大家,得出的任何对策都一定要分配到具体的人,如果纠正措施不能成为这个会议后的首要任务,那么这就不是纠正措施。(这是为了防止会议上讨论了一系列好想法,可是永远也不付诸行动。)
- 在会议期间要对事故完整的时间表达成一致的认识。包括在什么时间、是谁发现的问题,通过什么途径发现的问题(例如,自动监测、手动检测、客户反馈),在什么时间服务得到了彻底的恢复,等等。我们还将在事故发生期间所有的外部讨论归纳到时间表中。提到“时间表”,大家可能会理解为调查问题并解决问题的步骤。实际上,特别是在复杂的系统中,导致事故发生的事件可能会有许多,并且将会采取多种解决问题的故障排查方案和措施。 在这项活动中,我们试图记录所有的事件和所有参与者的观点,并尽可能地建立出各种可能的因果关系的假设。
- 事后分析团队将列出所有造成事故的人为因素和技术因素,并将其归类,如“设计决策”“修复”“发现的问题”等。团队将使用头脑风暴和“十万个怎么样”方法,对他们认为特别重要的诱因进行深入挖掘,从而探索更深层次的诱因。所有的观点都应当得到包容和尊重,不允许争论或否认其他人已经确认的诱因。会议协调人特别需要注意的是,必须确保做这项活动的时间充足,而且团队不应尝试去异存同,不要试图确定出一个或几个“根本原因”。
- 与会人员要就会后首要任务清单达成一致意见。清单所列内容需要集思广益,并选择能防止问题复发的任务,或者能更快发现问题并复原的任务。列表还可以包括改进系统的其他方式。
我们的目标是确定实现预期结果的最小增量步骤,而不是“大爆炸”式的变更,因为那不仅需要更长的实施时间,还会推迟改进。我们还会生成一份单独的列表,列出那些优先级较低的任务,并为其分配一个负责人。如果将来发生类似的问题,就可以基于这些任务制定对策。 - 与会人员还要讨论事故的衡量指标和事故对组织造成的影响。例如,我们可以使用下列指标来定量描述事故。
- 事件严重性:这个问题的严重程度。严重性会直接影响服务和客户。
- 总停机时间:服务完全不可用的时间。
- 检测时间:发现问题所需的时间。
- 解决时间:知道问题以后恢复服务所用时间。
Etsy 公司的 Bethany Macri 是这么总结的:“在事故分析中对事不对人并不意味着没有人承担责任,而是想了解在什么情况下允许人员执行变更,或者谁引入的问题。没有责难,就没有顾虑;没有了顾虑,就可以坦诚相待。”
附录 9 猿猴军团
在 2011 年 AWS 的美东服务中断事故之后,Netflix 曾就如何自动处理系统故障讨论过多次。一个名为“捣乱猴”的服务就是这些讨论的结果。
此后,捣乱猴逐渐演变成了一套全系列的工具,内部称之为“Netflix 猿猴军团”,用来模拟灾难的不同程度
- 捣乱大猩猩:模拟整个 AWS 可用区域(ZA)的故障。
- 捣乱金刚:模拟整个 AWS 地区(Region)的故障,如北美或欧洲。
- 延迟猴子:在其 RESTful 客户端服务器的通信层人为引入的延迟或停机,以模拟服务降级,并确保相关服务正常工作。
- 一致性猴子:查找并关闭不符合最佳实践的 AWS 实例(例如,实例不属于任何自动伸缩组,或服务目录中没有值班工程师的电子邮件地址)。
- 医生猴子:检查每个运行的实例,找到不健康的实例,如果负责人没有及时修复,就主动关闭实例。
- 看门猴子:确保他们的云环境没有混乱和浪费,搜索未使用的资源并处理。
- 安全猴子:一致性猴子的升级版,找到并终止有安全违规或漏洞的实例,例如 AWS 安全组配置错误。
附录 10 上线时间透明化
Lenny Rachitsky 这么陈述他所谓的“上线时间透明化”的优势。
- (1) 支持的成本下降。因为用户能够自己识别系统里的问题,无需打电话或发电子邮件给支持部门。用户不再需要猜测是本地问题还是全局性问题,并且可以在跟运维抱怨之前更快速地定位问题。
- (2) 在宕机期间能与客户更良性沟通。利用互联网传播的优势而不是电子邮件、电话这种一对一性方式,能实现更好的沟通效果。在客户沟通上省事了,就有更多时间来解决问题。
- (3) 让客户在发生宕机事故时有明确的可寻求帮助的途径,不必再四处搜索论坛、Twitter 或博客。
- (4) 信任是所有 SaaS 应用成功的基石。客户将自己的业务和生计都押宝在了你的服务或平台上。现有和潜在的客户都需要信任服务。他们想确保当服务出现问题时自己也有知情权。让他们实时了解意外事件是建立信任的最佳方法,向客户隐瞒实情不再可取。
- (5) 认真负责的 SaaS 提供商早晚都会提供公开的健康度仪表板,这只是时间问题,因为用户有这样的需求。
26. 术语
DOP & Handbook Glossary
| 英文 | 中文 |
|---|---|
| A/B Testing | A/B 测试 |
| Acceptance Stage | 验收阶段 |
| Acceptance Test-Driven Development (ATDD) | 验收测试驱动开发 |
| Acceptance Test | 验收测试 |
| Accident | 事故 |
| Affinity | 亲和 |
| Agile | 敏捷 |
| Andon Cord | 安灯绳 |
| Anomaly Detection Technique | 异常探测技术 |
| Antifragility | 抗脆弱性 |
| Application Deployment | 应用部署 |
| Artifact Management | 构件制品库管理 |
| Artifact | 制品 |
| Automated Test | 自动化测试 |
| Automation | 自动化 |
| Backlog | 待办事项列表 |
| Bad Apple Theory | 坏苹果理论 |
| Bad Path | 坏路径 |
| Batch Size | 批次尺寸、批量大小 |
| Blame | 指责 |
| Blameless Post Mortem | 不指责的事后分析 |
| Blamelessness | 免责 |
| Blue-Green Deployment | 蓝绿部署 |
| Blue-Green Deployment Pattern | 蓝绿部署模式 |
| Branching Strategy | 分支策略 |
| Brownfield | 棕地 |
| Build | 构建 |
| Business Value | 业务价值 |
| Canary Release | 金丝雀发布 |
| Canary Release Pattern | 金丝雀发布模式 |
| Card | 卡片 |
| Change Category | 变更类别 |
| Change Schedule | 变更计划 |
| Cloud Computing | 云计算 |
| Cloud Configuration File | 云配置文件 |
| Cluster Immune System Release Pattern | 集群免疫系统发布模式 |
| Code Branch | 代码分支 |
| Code Review Form | 代码审查表 |
| Codified Nfr | 成文的非功能需求 |
| Collaboration | 协作 |
| Commit Stage | 提交阶段 |
| Commit Code | 提交代码 |
| Compliance Requirement | 合规性要求 |
| Compliance Checking | 合规性检查 |
| Compliancy Officer | 合规检测官 |
| Configuration Management | 配置管理 |
| Container | 容器 |
| Continuous Deployment | 持续部署 |
| Continuous Integration | 持续集成(CI) |
| Continuous Delivery | 持续交付(CD) |
| Conways Law | 康威定律 |
| Cycle Time | 周期时间 |
| Defect Tracking | 缺陷跟踪 |
| Definition Of Done (DoD) | 完成的定义 |
| Dev Ritual | 开发惯例 |
| Developer | 开发人员 |
| Development | 开发 |
| Devops Transformation | DevOps 转型 |
| Downstream/Upstream | 下游/上游 |
| Downwards Spiral | 恶性循环 |
| E-Mail Pass-Around | 电子邮件轮查 |
| Expand/Contract Pattern | 扩张/收缩模式 |
| Exploratory Test | 探索性测试 |
| Fast Feedback | 快速反馈 |
| Feature | 特性 |
| Feature Flag | 特性标志 |
| Feature Toggle | 特性开关 |
| Feedback/Feedback Loop | 反馈/反馈回路 |
| Feedforward/Feedforward Loop | 前馈/前馈回路 |
| Flow | 流动 |
| Gated Commit | 门控提交 |
| Gaussian Distribution | 高斯分布 |
| Green Build | 绿色构建 |
| Greenfield | 绿地 |
| Handoff | 交接 |
| Hand-Off Readiness Review | 交接就绪评审 |
| Happy Path | 愉快路径 |
| Hypothesis-Driven Development | 假设驱动开发 |
| Incident | 事件 |
| Information Radiator | 信息辐射器 |
| Infosec | 信息安全 |
| Infrastructure Automation | 基础架构自动化 |
| Infrastructure As Code | 基础架构即代码 |
| Integration Tests | 集成测试 |
| I-Shaped, T-Shaped, E-Shaped | I 型、T 型、E 型 |
| Iteration | 迭代 |
| Itsm (It Service Management) | IT 服务管理 |
| Ji-Kotei-Kanketsu (JKK) | 质量检查(JKK) |
| Just Culture | 公正文化 |
| Just-In-Time (JIT) | 准时制 |
| Kaizen (In Lean) | 改善 |
| Kaizen Blitz (Or Improvement Blitz) | 改善闪电战 |
| Signboard | 看板 |
| Kata | 套路 |
| Large Batch Size Merge | 大批量合并 |
| Latent Defect | 潜在缺陷 |
| Lauching Guidance | 发布指导 |
| Launch Readiness Review | 投产就绪评审 |
| Lead Time | 前置时间 |
| Lean | 精益 |
| Learning Culture | 学习文化 |
| Logging Level | 日志级别 |
| Loosely Coupled Architecture | 松耦合架构 |
| Micro-Service | 微服务 |
| Minimum Viable Product | 最小化可行产品 |
| Monitoring Framework | 监控框架 |
| Monolithic Application | 单体应用 |
| Monolytics | 单体应用 |
| MTTR | 平均恢复时间 |
| Non-Functional Requirement (NFR) | 非功能性需求 |
| Non-Functional Requirement (NFR) Testing | 非功能需求测试 |
| (Non) Ideal Testing Pyramid | (非)理想测试金字塔模型 |
| One-Piece-Flow | 单件流 |
| Operations | 运维 |
| Operations Story | 运维故事 |
| Ops Liaison | 运维联络人 |
| Organisational Typology Model | 组织结构模型 |
| Organization Archetype | 组织原型 |
| Organizational Learning | 组织级学习 |
| Over-The-Shoulder | 观察者评审 |
| Package | 包 |
| Pair Programming | 结对编程 |
| Peer Review | 同行评审 |
| Pilot | 试点 |
| Pipeline | 流水线 |
| Plan-Do-Check-Act Cycle (PDCA Cycle) | 计划-实施-检查-改进循环(戴明环) |
| Post-Mortem | 事后分析 |
| Process Time | 处理时间 |
| Product Owner | 产品负责人 |
| Pull Request Process | 拉动请求流程 |
| QA | 质量保证 |
| Reduce Batch Size | 降低批次尺寸 |
| Reduce Number Of Handoffs | 减少交接次数 |
| Regression Test | 回归测试 |
| Release Branch | 发布分支 |
| Release Manager | 发布经理 |
| Release Pattern | 发布模式 |
| Retrospective | 回顾 |
| Rhythm | 节奏 |
| Roll-Back | 回滚 |
| Sad Path | 不愉快路径 |
| Safety Culture | 安全文化 |
| Safety Conditions | 安全条件 |
| Scaling | 规模化 |
| Scrum | Scrum |
| Scrum Master | Scrum Master |
| Security Testing | 安全测试 |
| Self Service Capability | 自服务能力 |
| Service Deployment | 服务部署 |
| Service Level Agreement (SLA) | 服务级别协议(SLA) |
| Shared Goal | 共同目标 |
| Shared Operations Team (SOT) | 共享运维团队 |
| Shared Version Control | 共享版本控制 |
| Single Repository | 单一存储库 |
| Smoke Testing | 冒烟测试 |
| Sprint | 冲刺 |
| Staging | Staging |
| Staging Environments, SIT | 准生产环境 |
| Stakeholder | 利益干系人 |
| Standard Deviation | 标准差 |
| Standard Operations | 标准运维 |
| Static Code Analysis | 静态代码分析 |
| Swarm | 聚集、聚焦、会诊、围观(动词) |
| Swarming | 聚集 |
| System Of Engagement (SOE) | 交互系统 |
| System Of Records (SOR) | 记录系统 |
| Technical Debt | 技术债务 |
| Technology Adaption Curve | 技术适应曲线 |
| Technology Executive | 技术主管 |
| Telemetry | 遥测 |
| Test Coverage Analysis | 测试覆盖率分析 |
| Test Story | 测试故事 |
| Test-Driven Development | 测试驱动开发 |
| The Downward Spiral - TDS | 下行螺旋 |
| The Agile Manifesto | 敏捷宣言 |
| The Lean Movement | 精益运动 |
| The Simian Army: Chaos Gorilla Chaos Kong Conformity Monkey Doctor Monkey Janitor Monkey Latency Monkey Security Monkey | 猿猴军团(可靠性监控服务): 捣乱大猩猩 捣乱金刚 一致性猴子 医生猴子 看门猴子 延迟猴子 安全猴子 |
| The Three Ways | 三步工作法 |
| Theory Of Constraints | 约束理论 |
| Ticketing System | 工单系统 |
| Tightly-Coupled | 紧耦合 |
| Tool-Assisted Review | 工具辅助评审 |
| Tool | 工具 |
| Toyota Production System (TPS) | 丰田生产系统 |
| Toyoto Kata | 丰田套路 |
| Transformation Team | 转型团队 |
| Trunk | 主干 |
| User Story | 用户故事 |
| Value Stream Mapping | 价值流映射 |
| Value Stream | 价值流 |
| Velocity | 速率 |
| Version Control | 版本控制 |
| Virtualized Environment | 虚拟化环境 |
| Visible | 可视的 |
| Visualisation | 可视化 |
| Waste | 浪费 |
| Waste Reduction | 减少浪费 |
| Waterfall | 瀑布式 |
| WIP (Work In Progress / Process) | 在制品 |
| WIP Limit | 在制品限制 |
| Work Center | 工作中心 |