网站开发需要音响厂家东莞网站建设
1. 介绍
尽管没有对物体的位置提供监督,但卷积神经网络 (CNN) 各层的卷积单元实际上可以充当物体检测器。尽管卷积层具有这种出色的物体定位能力,但当使用全连接层进行分类时,这种能力就会丧失。最近,一些流行的全卷积神经网络,如 Network in Network (NIN) [13] 和 GoogLeNet [25] 被提出来,以避免使用全连接层来最小化参数数量,同时保持高性能。
为了实现这一点,[13] 使用全局平均池化作为结构正则化器,防止训练期间过度拟合。全局平均池化层的优势不仅仅是简单地充当正则化器。事实上,只需稍加调整,网络就可以保留其卓越的定位能力,直到最后一层。这种调整允许在单个前向传递中轻松识别各种任务的判别图像区域,即使是网络最初未经过训练的任务。如图 1(a) 所示,经过对象分类训练的 CNN 能够成功地将动作分类的判别区域定位为人类正在与之交互的对象,而不是人类本身。

对全局平均池化层进行简单的修改,结合我们的类激活映射 (CAM) 技术,经过分类训练的 CNN 可以在一次前向传递中对图像进行分类并定位特定类别的图像区域。
1.1 相关工作
尽管 CNN 是在图像级标签上进行训练的,但它仍然具有出色的定位物体的能力。使用适当的架构,我们可以将这种能力推广到不仅仅是定位物体,还可以开始准确识别图像的哪些区域被用于识别。与本文最相关的两条工作路线:弱监督物体定位 和 可视化 CNN 的内部表示。
1.1.1 弱监督物体定位
Bergamo 等人 [1] 提出了一种自学物体定位技术,涉及屏蔽图像区域以识别导致最大激活的区域,从而定位物体。Cinbis 等人 [2] 和 Pinheiro 等人 [18] 将多示例学习与 CNN 特征相结合来定位物体。Oquab 等人 [15] 提出了一种传输中级图像表示的方法,并表明可以通过评估多个重叠块上的 CNN 输出来实现某些物体定位。虽然这些方法产生了有希望的结果,但它们不是端到端训练的,需要网络的多次前向传递来定位物体,这使得它们难以扩展到现实世界的数据集。我们的方法是端到端训练的,可以在一次前向传递中定位物体。
与我们的方法最相似的是 Oquab 等人基于全局最大池化的工作 [16]。他们不使用全局平均池化,而是应用全局最大池化来定位物体上的一个点。然而,它们的定位仅限于物体边界上的一个点,而不是确定物体的完整范围。虽然最大函数和平均函数非常相似,但使用平均池化可以鼓励网络识别物体的完整范围。与最大池化相比,当网络识别出物体的所有判别区域时,平均池化的损失会受益。
使用类激活图来指代为每个图像生成的加权激活图。虽然全局平均池化并不是我们在此提出的新技术,但据我们所知,它可以应用于准确的判别定位。这种技术的简单性使其具有可移植性,可以应用于各种计算机视觉任务,以实现快速准确的定位。
1.1.2 可视化CNN
Zeiler 等人 [30] 使用反卷积网络来可视化激活每个单元的模式。Zhou 等人 [34] 表明,CNN 在接受场景识别训练的同时学习物体检测器,并证明同一个网络可以在一次前向传递中同时执行场景识别和物体定位。但都只分析了卷积层,而忽略了全连接层。通过删除全连接层并保留大部分性能。
Mahendran 等人 [14] 和 Dosovitskiy 等人 [4] 通过反转不同层的深度特征来分析 CNN 的视觉编码。虽然这些方法可以反转全连接层,但它们只显示了深度特征中保留了哪些信息,而没有突出这些信息的相对重要性。与 [14] 和 [4] 不同,我们的方法可以准确突出显示图像中哪些区域对于区分很重要。
2. 类激活映射(CAM)
使用 CNN 中的全局平均池化 (GAP) 生成类激活图 (CAM) 的过程。特定类别的类激活图表示 CNN 用来识别该类别的判别图像区域。生成这些图的过程如图 2 所示。
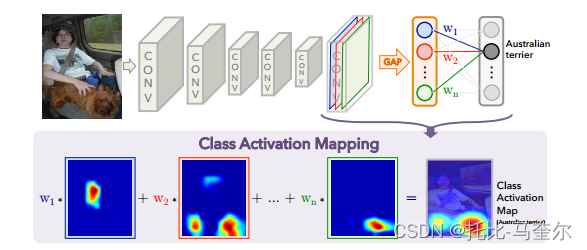
类别激活映射:预测的类别分数被映射回前一个卷积层以生成类别激活图 (CAM)。CAM 突出显示特定于类别的判别区域。
使用的网络架构类似于 Network in Network [13] 和 GoogLeNet [25] -