网页设计与网站开发前端优化网站
本篇文章我将介绍使用智谱 AI 最新开源的 GLM-4-9B 模型和 GenAI 云服务 SiliconCloud 快速构建一个 RAG 应用,首先我会详细介绍下 GLM-4-9B 模型的能力情况和开源限制,以及 SiliconCloud 的使用介绍,最后构建一个编码类智能体应用作为测试。
本文首发自博客 使用智谱 GLM-4-9B 和 SiliconCloud 云服务快速构建一个编码类智能体应用
我的新书《LangChain编程从入门到实践》 已经开售!推荐正在学习AI应用开发的朋友购买阅读,此书围绕LangChain梳理了AI应用开发的范式转变,除了LangChain,还涉及其他诸如 LIamaIndex、AutoGen、AutoGPT、Semantic Kernel等热门开发框架。

GLM-4-9B 有多强
智谱家 GLM-4-9B 模型的发布,可以称得上大模型开源领域的又一个里程碑事件,除了开源行为本身值得肯定,我觉得开源出来的模型可以接入线上应用直接使用,可能对我们做应用层的开发者意义更大。话不多说,看 GLM-4-9B 的介绍:
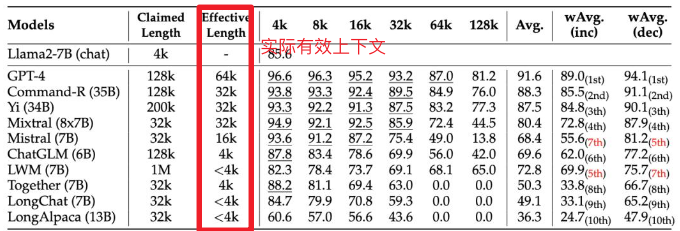
首先 GLM-4-9B 模型结构与 GLM-3-9B 变化不大,主要是模型层数由 28 增加到 40,词表大小由 65024 扩充到 151552、支持的上下文长度支持从 32K、128K 扩展到 128K、1M(GLM-4-9B-Chat-1M),做应用最关注的就是长上下文(多轮对话记忆保持、各种阅读助手、长文本理解等常见场景)能力和 Function Call 能力(工具调用,构建智能体应用的基础)。
1M 的上下文长度(约 200 万中文字符)方面,GLM-4-9B 在大海捞针测试中全绿。

不过根据英伟达研究团队最近新提出的名为RULER的新基准,这里选用的测试方法(测试的 LWM 声称上下文长度 1M,实际不到 4K)测出来的结果有水分,这个我还会自己测试下。
Function Call 能力也属于 gpt-4-turbo 级别,使用 Berkeley Function-Calling Leaderboard 测试集,这个对我来说比较有说服力,有兴趣的可以看看测试集设计,不过毕竟测试集公开,混在训练集里也不好说,这个我也按照相同思路设计了对应的私有中文测试集,引入之前也会再跑一次作为交叉验证。
| Model | Overall Acc. | AST Summary | Exec Summary | Relevance |
|---|---|---|---|---|
| Llama-3-8B-Instruct | 58.88 | 59.25 | 70.01 | 45.83 |
| gpt-4-turbo-2024-04-09 | 81.24 | 82.14 | 78.61 | 88.75 |
| ChatGLM3-6B | 57.88 | 62.18 | 69.78 | 5.42 |
| GLM-4-9B-Chat | 81.00 | 80.26 | 84.40 | 87.92 |
虽然开源,但也存在限制,就是学术研究免费,商业用途需要登记且必须遵守相关条款和条件,详见 Github 项目介绍:https://github.com/THUDM/GLM-4
SiliconCloud 有多好用
SiliconCloud 是硅基流动推出的 GenAI 云服务,这是国内同类产品中我体验最好的一家,便宜且推理速度还快,国外已经有很多类似服务了,比如 Banana, Replicate, Beam, Modal 、OctoAI、ModelZ、BentoML等,这类服务主要用于私有模型或常见开源模型托管,通过它们自研的推理加速引擎、大模型基础设施优化能力,大幅降低大模型的部署及推理成本,降低 AI 应用的成本,加速 AI 产品的落地 。
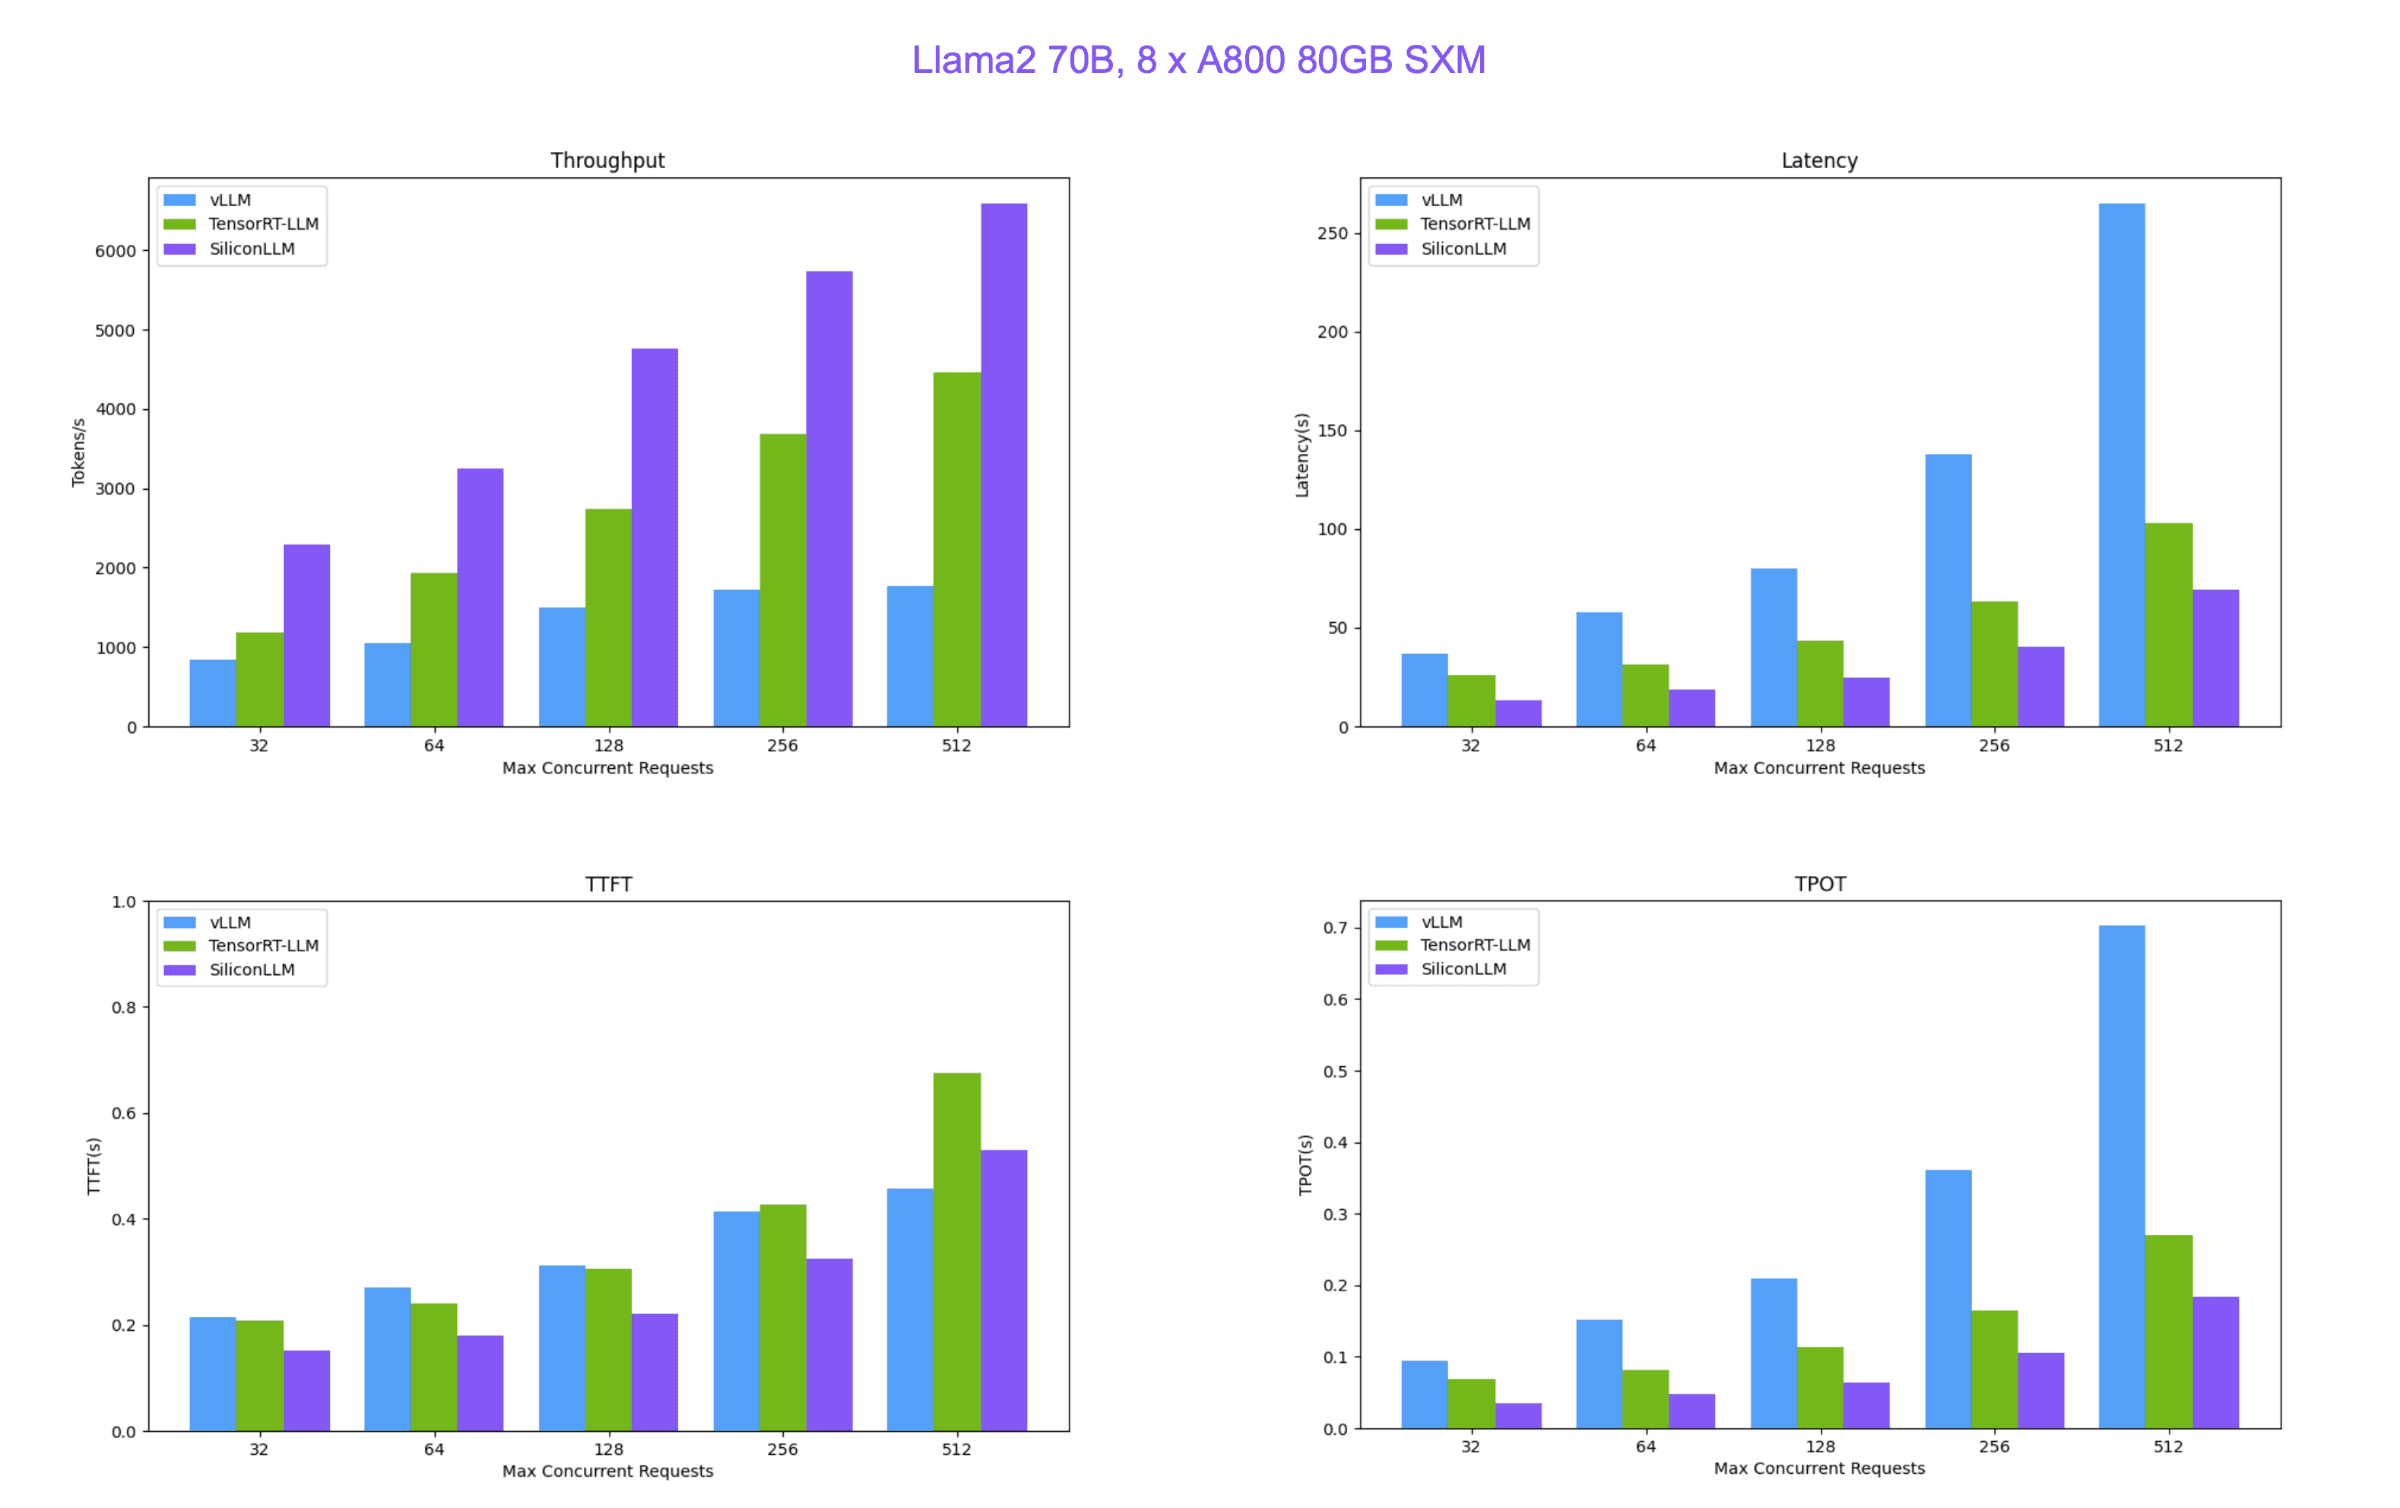
SiliconCloud 便宜又快的原因就在于硅基流动自研的 LLM 推理加速引擎 SiliconLLM ,支持 Llama3、Mixtral、DeepSeek、Baichuan、ChatGLM、Falcon、01-ai(零一万物开源的模型)、GPT-NeoX 等模型加速,下面是 SiliconLLM 与推理框架vLLM(伯克利大学 LMSYS 组织开源)、Tensorrt-LLM(英伟达开源)的性能比较。
最后补充一组我自己本地随手测试的 API 调用服务吞吐:
- 首次响应时间与最快响应时间差(
Latency saved 0.03s): 表示首次响应时间与最快响应时间之间的差异,这个指标可以反映出大模型 API 服务在处理请求时的波动。 - 优化后的首 token 响应时间(
Optimized TTFT 0.36s):是指在多次请求中,最快的一次首 token 响应时间。 - 首 token 响应时间中位数(
Median TTFT 0.03s):是指在所有请求中,首 token 响应时间的中位数,即一半的请求首 token 响应时间比这个值快,另一半比这个值慢。中位数可以提供一个更稳健的性能指标,因为它不受极端值的影响。 - 生成的 token 数量(
Tokens: 19):表示在请求过程中生成的 token 总数。 - token 生成速率(
79 tokens/sec): 表示每秒生成的 Token 数量,这是衡量大模型 API 服务处理能力的一个指标。 - 总时间(
Total time: 0.59s): 表示从开始发送 HTTP 请求到接收到最后一个 token 的时间,这是整个请求处理过程的总耗时

构建编码类智能体应用
首先前往官网 👉 https://cloud.siliconflow.cn/auth/login 注册 SiliconCloud 账号,无需手机号,邮箱注册即可(值得一提,新用户注册可以得到 42 元免费额度用于体验,相当于 3 亿 tokens),按流程注册,保存好生成的 API-KEY。
开始之前先设置好 SiliconCloud 的 GLM-4-9B-Chat 模型, API 调用方式也与 OpenAI 兼容 ,所以可以直接使用 OpenAI SDK (langchain_openai)来访问 SiliconCloud 上的任意模型。
import os
from langchain_openai import ChatOpenAI
sc_api_key = os.getenv("SC_API_KEY")
llm = ChatOpenAI(base_url="https://api.siliconflow.cn/v1",api_key=sc_api_key,model="zhipuai/glm4-9B-chat")
后续代码和这篇文章 DeepSeek-V2 到底有多强?写一个 AI 编码 Agent 测测看(附详细代码)基本一致,也有着详细解释过程,这里不再赘述,后台回复 DeepSeek可获取完整代码。