企业要建设一个网站需要多少钱购买网域名的网站好
11月6日,在第六届中国国际进口博览会上,普华永道发布企业数据资源会计处理一体化平台(英文名为Data Accounting Platform,简称DAP)。该产品以普华永道“五步法”数据资源入表路径为理论依据,依托多年来普华永道在数据资产化领域的研究沉淀与实践积累,致力于通过智能化手段帮助企业加强数据资源管理、便捷实现数据资源入表。
普华永道中国区域经济主管合伙人张立钧在发布会上指出:“数据是数字经济时代的重要战略性资源,而数据的交易和数据价值的体现仍处于非常初级的阶段。中央政府近几年推出了一系列鼓励和培育数据要素市场、发展数字经济的政策,地方政府也在探索从 ‘土地财政’ 转向 ‘数据财政’ ,《企业数据资源相关会计处理暂行规定》释放的积极信号将有力引导企业开展相关工作,从而推动数字经济的持续健康发展。”
在“数据二十条”明确提出探索数据资产入表新模式后,财政部于今年8月21日颁布《企业数据资源相关会计处理暂行规定》(以下简称“《暂行规定》”),待2024年1月1日正式实施后,“数据资源是否入表”将不再是部分企业内部管理视角的选择题,而是所有企业财务合规视角的必答题。
普华永道中国金融业管理咨询主管合伙人王建平表示:“数据是企业经营管理的关键生产要素,《暂行规定》将促使企业更加重视数据资源的管理和使用,积极参与数据要素流通市场,这必将驱动企业继续深化数字化转型,以充分挖掘和释放数据价值。而随着企业数据资源相关会计信息披露的加强,也将推动资本市场发现企业潜在价值。”
DAP以《暂行规定》中对于数据资源的会计处理要求及相关会计准则为基础,自下而上通过治理层、账户层、引擎层、应用层的功能设计,建立数据资源统一管理体系、满足数据资源的会计处理要求,帮助企业实现自动化、一体化的数据资源会计处理。
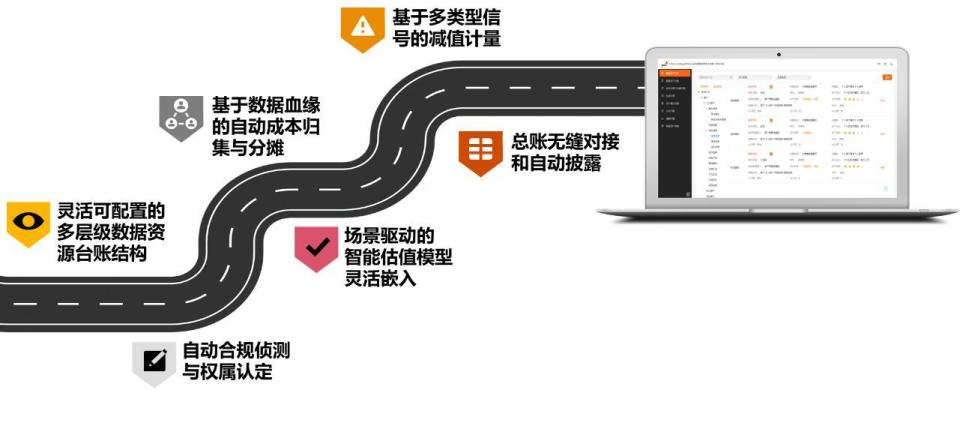
DAP的六大核心功能
· 灵活可配置的多层级数据资源台账结构
DAP可根据各类数据资源特点,灵活配置个性化的数据资源台账结构,同时体现不同层级间数据资源的关联关系,满足不同层级数据资源的管理需求,清晰展示数据资源分户账信息,有效提升管理效率。
· 自动合规侦测与权属认定
DAP 自动合规侦测及权属认定依据数据特性建立数据分类分级矩阵,将数据按业务类型、类别、安全等级等维度进行划分后,基于平台内嵌的合规库及风险评估框架,覆盖《网络安全法》《数据安全法》《个人信息保护法》和《个人信息安全规范》 及数据采集存储、加工分析、使用和交易环节确权风险控制要求 ,进行合规风险的审查,并内置预警信号,全方位捕捉违规,敏捷预警。 DAP 权属认定体系明确数据的划分种类,贯穿企业数据全生命周期,动态界定数据要素与数据产品。
· 基于数据血缘的自动成本归集与分摊
DAP可实现数据资源成本的自动化计量。成本归集与分摊引擎可基于数据血缘分析与追溯功能,梳理数据资源形成链路中所涉及的各项直接成本及间接成本。其中,对直接成本进行归集计算、对间接成本进行合理分摊,明确分摊至单位数据资源的间接成本。最终将直接成本与间接成本进行归总计算,自动输出数据资源成本,全过程清晰展示计算逻辑,使数据成本的获取更加可靠、智能。
· 场景驱动的智能估值模型灵活嵌入
DAP将基于企业不同的数据资源分类、业务交互需求和应用场景分类,利用历史过往成效分析、同业比较情况,结合回归或AI模型,通过智能匹配行业场景及业务价值指标,从而量化预期数据带来的业务经济收益,夯实数据资源入表条件基础;此外,DAP搭载的估值引擎亦提供了灵活敏捷的数据资产货币化估值的能力,可以服务于企业日常业务管理需求,如:内外部数据交易定价、数据采购投资等。
· 基于多类型信号的减值计量
打通业务、数据、财务、合规等多方面管理视角,DAP从多个维度归纳各类减值迹象信号,并通过预设的数据资源减值判定规则,持续监测并指引企业已入表的数据资源在后续计量阶段触发减值测试的条件。当某一项已经入表的数据资源,出现了相应的减值迹象,则进一步采用相应的减值计量模型工具计量相应的减值金额,确保数据资源价值持续可靠计量,该功能也是进一步保障准确披露的关键步骤。
· 总账无缝对接和自动披露
《暂行规定》要求企业根据重要性原则结合实际情况增设报表子项目,并通过定性结合定量、强制结合自愿方式细化相关的列报披露。通过DAP上述系统功能的建立,关联企业数据资源各项账务处理与列报自动计算,进一步实现总账与列报的无缝对接。结合DAP预设的强制、自定义披露内容模板,为企业提供可定义、自动化的列报披露内容参考,以满足《暂行规定》的强制披露要求与企业个性化披露选择。
普华永道中国模型及评估咨询服务合伙人詹睿表示:“‘入表’是从资产角度揭示数据资源的经济价值,客观反映数字化赋能为企业带来经济利益的流入情况,因此,站在企业管理层、数据管理人员、业务人员、财务人员的角度,数据资源能够入表也是对其在数据战略规划、数据能力建设、数据治理升级、数据创新应用等领域成绩的认可。”
编辑垂注:
普华永道 - 中国内地、香港地区及澳门地区
普华永道中国内地、香港地区及澳门地区成员机构根据各地适用的法律协作运营。整体而言,员工总数超过20,000人,其中包括逾800名合伙人。
无论客户身在何处,普华永道均能提供所需的专业意见。我们实务经验丰富、高素质的专业团队能聆听各种意见, 帮助客户解决业务问题,发掘并把握机遇。我们的行业专业化有助于就客户关注的领域共创解决方案。
我们分布于以下城市:北京、上海、香港、沈阳、天津、大连、济南、青岛、郑州、西安、南京、合肥、苏州、无锡、武汉、成都、杭州、宁波、重庆、长沙、昆明、厦门、广州、深圳、澳门、海口、珠海、贵阳、雄安。
©2023普华永道 版权所有