设计师免费素材网站推荐优惠券推广网站怎么做
目录
排序算法-堆积树排序法(HeapSort)
1、说明
2、算法分析
3、C++代码
排序算法-堆积树排序法(HeapSort)
1、说明
堆积树排序法是选择排序法的改进版,可以减少在选择排序法中的比较次数,进而减少排序时间。堆积排序法用到了二叉树的技巧,是利用堆积树来完成排序的。堆积树是一种特殊的二叉树,可分为最大堆积树和最小堆积树两种。
最大堆积树满足以下3个条件:
- 它是一棵完全二叉树。
- 所有节点的值都大于或等于它左右子节点的值。
- 树根是堆积树中最大的。
最小堆积树具备以下3个条件:
- 它是一棵完全二叉树。
- 所有节点的值都小于或等于它左右子节点的值。
- 树根是堆积树中最小的。
2、算法分析
- 在所有情况下,时间复杂度均为
。
- 堆积排序法不是稳定排序法。
- 只需要一个额外的空间,空间复杂度为
。
3、C++代码
#include<iostream>
#include<iomanip>
using namespace std;void Print(int* data, int size) {for (int i = 1; i < size; i++)cout << "[" << setw(2) << data[i] << "] ";cout << endl;
}void Swap(int& i, int& j) {int temp = i;i = j;j = temp;
}void ad_heap(int* data, int i, int size) {int j = 2 * i;int temp = data[i];int post = 0;while (j <= size && post == 0){if (j < size) {if (data[j] < data[j + 1])j++;}if (temp >= data[j])post = 1;else {data[j / 2] = data[j];j *= 2;}}data[j / 2] = temp;
}void Heap(int* data, int size) {for (int i = (size / 2); i > 0; i--)ad_heap(data, i, size - 1);for (int i = size - 2; i > 0; i--) {Swap(data[1], data[i + 1]);ad_heap(data, 1, i);}
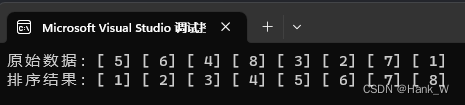
}int main() {int data[9] = { 0,5,6,4,8,3,2,7,1 };int size = 9;cout << "原始数据:";Print(data, size);Heap(data, size);cout << "排序结果:";Print(data, size);return 0;
}输出结果